Dell S3048-ON Networking S3048–ON Getting Started Guide - Page 12
Install the Hardware, Do not the use the mounted Ready-Rails as a shelf or a workplace.
 |
View all Dell S3048-ON manuals
Add to My Manuals
Save this manual to your list of manuals |
Page 12 highlights
Figure 5. Attaching the Switch Rails 2 After you have installed both switch rails, line them up on the previously mounted Ready-Rails and slide the switch in until it is flush with front of rack. About 3 inches before you fully insert your system, the rail locking feature engages to keep the switch from inadvertently sliding out of the rack and falling. NOTE: Do not the use the mounted Ready-Rails as a shelf or a workplace. Install the Hardware 12
-
 1
1 -
2
-
3
-
4
-
5
-
6
-
 7
7 -
 8
8 -
 9
9 -
 10
10 -
 11
11 -
 12
12 -
 13
13 -
 14
14 -
 15
15 -
 16
16 -
 17
17 -
18
-
19
-
20
-
21
-
22
-
23
-
24
-
25
-
26
-
27
-
28
-
29
-
30
-
31
 |
 |

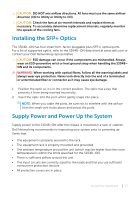
Figure 5. Attaching the Switch Rails
2
After you have installed both switch rails, line them up on the previously
mounted Ready-Rails and slide the switch in until it is flush with front of rack.
About 3 inches before you fully insert your system, the rail locking feature
engages to keep the switch from inadvertently sliding out of the rack and
falling.
NOTE:
Do not the use the mounted Ready-Rails as a shelf or a workplace.
Install the Hardware
12