Dell S3048-ON Networking S3048–ON Getting Started Guide - Page 14
Important Points to Remember
 |
View all Dell S3048-ON manuals
Add to My Manuals
Save this manual to your list of manuals |
Page 14 highlights
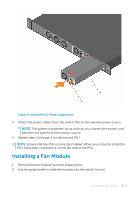
NOTE: Coat the one-hole lug with an anti-oxidant compound prior to crimping. Bring any unplated mating surfaces to a shiny finish, and coat with an antioxidant prior to mating. Plated mating surfaces must be clean and free from contamination. 1 Cut the ground cable to the desired length. The cable length must facilitate the proper operation of fault interrupt circuits. Dell Networking recommends using the shortest cable route allowable. 2 Attach the one-hole lug to the chassis using an M4x0.7 screw with a captive internal tooth lock washer, as shown. Torque the screw to 20 in-lbs. Figure 7. Attach the Ground Cable 3 Attach the other end of the ground cable to a suitable ground point. Important Points to Remember The S3048-ON is designed to support two hot-swappable power supplies with integrated fans that provide cooling for the chassis. • The S3048-ON ships with one power supply. Dell recommends purchasing a second power supply. • The PSU slides into the slot smoothly. Do not force the PSU into a slot as this action may damage the PSU or the S3048-ON chassis. • The S3048-ON supports AC power supplies with two air-flow directions (I/O to Utility and Utility to I/O). The S3048-ON does not support mixing PSU types. The fan airflow direction for the PSUs must be the same. CAUTION: DO NOT mix airflow directions. Both power supplies must use the same airflow direction (I/O to Utility or Utility to I/O). Install the Hardware 14
-
 1
1 -
2
-
3
-
4
-
5
-
6
-
7
-
8
-
 9
9 -
 10
10 -
 11
11 -
 12
12 -
 13
13 -
 14
14 -
 15
15 -
 16
16 -
 17
17 -
 18
18 -
 19
19 -
20
-
21
-
22
-
23
-
24
-
25
-
26
-
27
-
28
-
29
-
30
-
31
 |
 |
