Dell S5148F-ON Open Networking Hardware Diagnostic Guide September 2017 - Page 11
ONIE and Dell EMC OS installation instructions, BIOS setup, BIOS Boot
 |
View all Dell S5148F-ON manuals
Add to My Manuals
Save this manual to your list of manuals |
Page 11 highlights
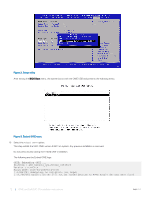
3 Copy the ONIE ISO image to the solid-state drive (SSD) of the ONIE target. ONIE:/ # wget --quiet http://xx.xx.x.xxx/tftpboot/users//onie-recovery-x86_64dell__c2538-r0.iso To copy the image, you can use SCP, TFTP, or WGET (ftp/http). scp [email protected]:/tftpboot/onie-recovery-x86_64-dell__c2538-r0.iso . 4 Confirm that the ISO file copied to the SDD over the network. ONIE:/ # ls -l ... -rw-r--r-- 1 root 0 39780352 Apr 10 11:55 onie-recovery-x86_64-dell__c2538-r0.iso ... 5 Insert a blank USB in the ONIE target's USB slot. Verify the USB block device using the ONIE logs. Info: eth0: Checking link... scsi 6:0:0:0: Direct-Access Kingston DataTraveler 2.0 1.00 PQ: 0 ANSI: 4 sd 6:0:0:0: [sdb] 15148608 512-byte logical blocks: (7.75 GB/7.22 GiB) sd 6:0:0:0: [sdb] Write Protect is off sd 6:0:0:0: [sdb] Write cache: disabled, read cache: enabled, doesn't support DPO or FUA sd 6:0:0:0: [sdb] Attached SCSI removable disk The logs show that the USB device is present: /dev/sdb. You can also check /sys/block. ONIE:/ # cd /sys/block/sdb ONIE:/sys/block/sdb # ls -l -r--r--r-- 1 root 0 4096 Apr 10 13:12 alignment_offset lrwxrwxrwx 1 root 0 0 Apr 10 13:12 bdi -> ../../devices/virtual/bdi/8:16 -r--r--r-- 1 root 0 4096 Apr 10 13:12 capability -r--r--r-- 1 root 0 4096 Apr 10 13:12 dev lrwxrwxrwx 1 root 0 0 Apr 10 13:12 device -> ../../devices/pci0000:00/0000:00:16.0/ usb1/1-1/1-1.1/1-1.1.1/1-1.1.1:1.0/host6/target6:0:0/6:0:0:0 ... 6 Use the dd command to copy the ISO image to the USB. ONIE:/ # dd if=./onie-recovery-x86_64-dell__c2538-r0.iso of=/dev/sdb bs=10M 3+1 records in 3+1 records out 39780352 bytes (37.9MB) copied, 6.890503 seconds, 5.5MB/s ONIE:/ # 7 Move the USB from the ONIE target (the system with ONIE) to the USB slot in your switch (the system without ONIE). 8 Power on your system and enter the BIOS setup menu by selecting Del when BIOS message appears. If you already powered on your system, reboot the system and enter the BIOS setup menu by selecting Del. 9 In the BIOS Boot menu, select UEFI USB. Select Save and Exit. ONIE and Dell EMC OS installation instructions 11
-
 1
1 -
2
-
3
-
4
-
5
-
 6
6 -
 7
7 -
 8
8 -
 9
9 -
 10
10 -
 11
11 -
 12
12 -
 13
13 -
 14
14 -
 15
15 -
 16
16 -
17
-
18
-
19
-
20
-
21
-
22
-
23
-
24
-
25
-
26
-
27
-
28
-
29
-
30
-
31
-
32
-
33
-
34
-
35
-
36
-
37
-
38
-
39
-
40
-
41
-
42
-
43
-
44
-
45
-
46
-
47
-
48
-
49
-
50
-
51
-
52
-
53
-
54
-
55
-
56
-
57
-
58
-
59
-
60
-
61
-
62
-
63
-
64
-
65
-
66
-
67
-
68
-
69
-
70
-
71
-
72
-
73
-
74
-
75
-
76
-
77
-
78
-
79
-
80
-
81
-
82
-
83
-
84
-
85
-
86
-
87
-
88
-
89
-
90
-
91
-
92
-
93
-
94
-
95
 |
 |
