Dell Venue 11 Pro Dell Venue Pro 11 -7130/7139 User's Guide - Page 45
System Setup, System Setup (BIOS) Options - boot from usb
 |
View all Dell Venue 11 Pro manuals
Add to My Manuals
Save this manual to your list of manuals |
Page 45 highlights
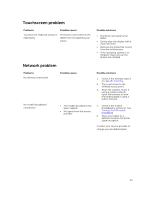
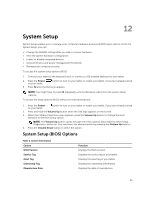
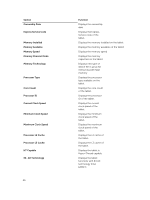
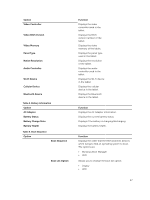
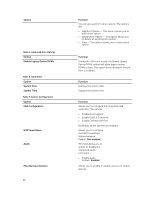
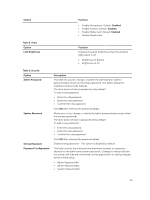
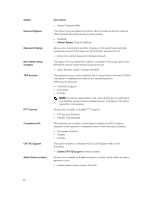
12 System Setup System Setup enables you to manage your computer hardware and specify BIOS‐level options. From the System Setup, you can: • Change the NVRAM settings after you add or remove hardware • View the system hardware configuration • Enable or disable integrated devices • Set performance and power management thresholds • Manage your computer security To access the system setup options (BIOS): 1. Connect your tablet to the keyboard dock or connect a USB enabled keyboard to your tablet. 2. Press the Power on your tablet. button to turn on your tablet or restart your tablet, if you have already turned 3. Press F2 after the Dell logo appears. NOTE: You might have to press F2 repeatedly until the Windows redirects to the system setup options. To access the setup options (BIOS) without an external keyboard : 1. Press the Power on your tablet. button to turn on your tablet or restart your tablet, if you have already turned 2. Press and hold the Volume Up button when the Dell logo appears on the screen. 3. When the F12 Boot Selection menu appears, press the Volume Up button to change the boot selection to the BIOS Setup option. NOTE: The Volume Up button cycles through the menu options (Boot Options, BIOS Setup, Diagnostics, and so on. You can select the desired option by pressing the Volume Up button.) 4. Press the Volume Down button to select the option. System Setup (BIOS) Options Table 2. System Information Option BIOS Version Service Tag Asset Tag Ownership Tag Manufacture Date Function Displays the BIOS revision. Displays the service tag of your tablet. Displays the asset tag of your tablet. Displays the ownership information. Displays the date of manufacture. 45
-
 1
1 -
2
-
3
-
4
-
5
-
6
-
7
-
8
-
9
-
10
-
11
-
12
-
13
-
14
-
15
-
16
-
17
-
18
-
19
-
20
-
21
-
22
-
23
-
24
-
25
-
26
-
27
-
28
-
29
-
30
-
31
-
32
-
33
-
34
-
35
-
36
-
37
-
38
-
39
-
 40
40 -
 41
41 -
 42
42 -
 43
43 -
 44
44 -
 45
45 -
 46
46 -
 47
47 -
 48
48 -
 49
49 -
 50
50 -
51
-
52
-
53
-
54
-
55
-
56
-
57
-
58
-
59
-
60
-
61
 |
 |