Dell XPS 400 9150 XPS 400/Dimension 9150 Service Manual - Page 42
Removing the Drive-Panel Insert, NOTICE
 |
View all Dell XPS 400 9150 manuals
Add to My Manuals
Save this manual to your list of manuals |
Page 42 highlights
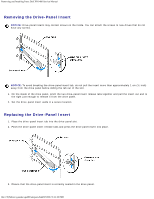
Removing and Installing Parts: Dell XPS 400 Service Manual Removing the Drive-Panel Insert NOTICE: Drive-panel inserts may contain screws on the inside. You can attach the screws to new drives that do not have any screws. NOTICE: To avoid breaking the drive-panel insert tab, do not pull the insert more than approximately 1 cm (½ inch) away from the drive panel before sliding the tab out of the slot. 1. On the inside of the drive panel, pinch the two drive-panel insert release tabs together and pull the insert out and to the right just enough to release it from the drive panel. 2. Set the drive-panel insert aside in a secure location. Replacing the Drive-Panel Insert 1. Place the drive-panel insert tab into the drive-panel slot. 2. Pinch the drive-panel insert release tabs and press the drive panel insert into place. 3. Ensure that the drive-panel insert is correctly seated in the drive panel. file:///T|/htdocs/systems/xps400/sm/parts.htm[8/3/2012 3:11:45 PM]
-
 1
1 -
2
-
3
-
4
-
5
-
6
-
7
-
8
-
9
-
10
-
11
-
12
-
13
-
14
-
15
-
16
-
17
-
18
-
19
-
20
-
21
-
22
-
23
-
24
-
25
-
26
-
27
-
28
-
29
-
30
-
31
-
32
-
33
-
34
-
35
-
36
-
 37
37 -
 38
38 -
 39
39 -
 40
40 -
 41
41 -
 42
42 -
 43
43 -
 44
44 -
 45
45 -
 46
46 -
 47
47 -
48
-
49
-
50
-
51
-
52
-
53
-
54
-
55
-
56
-
57
-
58
-
59
-
60
-
61
-
62
-
63
-
64
-
65
-
66
-
67
-
68
-
69
 |
 |
