Dell XPS 400 9150 XPS 400/Dimension 9150 Service Manual - Page 50
Media Card Reader, Installing a Floppy Drive, Removing a Media Card Reader
 |
View all Dell XPS 400 9150 manuals
Add to My Manuals
Save this manual to your list of manuals |
Page 50 highlights
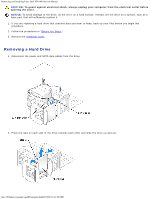
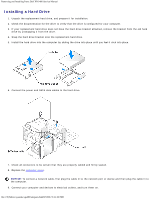
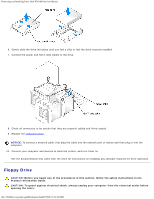
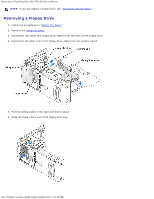
Removing and Installing Parts: Dell XPS 400 Service Manual Installing a Floppy Drive 1. If you are installing a new floppy drive, remove the shoulder screws from the inside of the drive-panel insert and attach the screws to the new drive. 2. Slide the floppy drive into the floppy drive bay until the sliding plate clicks into place and the drive snaps into position. 3. Attach the power and floppy-drive cables to the floppy drive. 4. Connect the other end of the floppy-drive cable to the connector labeled "FLOPPY" on the system board. For more information on the system board, see "System Board Components." 5. Check all cable connections, and fold cables out of the way to provide airflow for the fan and cooling vents. 6. Replace the computer cover. NOTICE: To connect a network cable, first plug the cable in to the network port or device and then plug it in to the computer. 7. Connect your computer and devices to their electrical outlets, and turn them on. See the documentation that came with the floppy drive for instructions on installing any software required for the operation of the drive. 8. Enter system setup and select the appropriate Diskette Drive option. 9. Verify that your computer works correctly by running the Dell Diagnostics. Media Card Reader Removing a Media Card Reader CAUTION: Before you begin any of the procedures in this section, follow the safety instructions in the Product Information Guide. NOTICE: To prevent static damage to components inside your computer, discharge static electricity from your body before you touch any of your computer's electronic components. You can do so by touching an unpainted metal surface on the computer chassis. 1. Follow the procedures in "Before You Begin." 2. Lay the computer on its side so that the system board is on the bottom of the inside of the computer. 3. Remove the computer cover. file:///T|/htdocs/systems/xps400/sm/parts.htm[8/3/2012 3:11:45 PM]
-
 1
1 -
2
-
3
-
4
-
5
-
6
-
7
-
8
-
9
-
10
-
11
-
12
-
13
-
14
-
15
-
16
-
17
-
18
-
19
-
20
-
21
-
22
-
23
-
24
-
25
-
26
-
27
-
28
-
29
-
30
-
31
-
32
-
33
-
34
-
35
-
36
-
37
-
38
-
39
-
40
-
41
-
42
-
43
-
44
-
 45
45 -
 46
46 -
 47
47 -
 48
48 -
 49
49 -
 50
50 -
 51
51 -
 52
52 -
 53
53 -
 54
54 -
 55
55 -
56
-
57
-
58
-
59
-
60
-
61
-
62
-
63
-
64
-
65
-
66
-
67
-
68
-
69
 |
 |
