Dell XPS M2010 MXP061 XPS M2010 Owners Manual - Page 83
RAID Level 1 Configuration, Configuring Your Computer for RAID
 |
View all Dell XPS M2010 MXP061 manuals
Add to My Manuals
Save this manual to your list of manuals |
Page 83 highlights
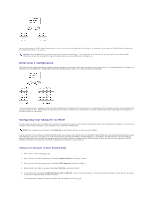
Another advantage of a RAID level 0 configuration is that it utilizes the full capacities of the drives. For example, if you have two 100-GB drives installed, you have 200 GB on which to store data. NOTICE: Because RAID level 0 configurations provide no data redundancy, if one drive fails, then the data on the other drive is also inaccessible. Therefore, ensure that you perform regular backups when you use a RAID level 0 configuration. RAID Level 1 Configuration RAID level 1 uses a data-redundancy storage technique known as "mirroring." When data is written to the primary drive, it is then duplicated, or mirrored, on the other drive. A RAID level 1 configuration sacrifices high data-access rates for its data redundancy advantages. If a drive failure occurs, subsequent read and write operations are directed to the surviving drive. A replacement drive can then be rebuilt using the data from the surviving drive. Also, because data is duplicated on both drives, a RAID level 1 configuration using two 120-GB hard drives collectively has a maximum of 120 GB on which to store data. Configuring Your Computer for RAID At some point you may want to configure your computer for RAID if you did not select a RAID configuration when you purchased your computer. You must have at least two hard drives installed in your computer to set up a RAID configuration. NOTE: Your computer was configured with RAID On as the default, whether or not you ordered RAID. You can use one of two methods to configure RAID hard drive volumes. One method uses the Intel RAID Option ROM utility and is performed before you install the operating system onto the hard drive. The second method uses the Intel Matrix Storage Manager, or Intel Matrix Storage Console, and this method is performed after you have installed the operating system and the Intel Matrix Storage Console. Both methods require that you set your computer to RAIDenabled mode before starting any of the RAID configuration procedures in this document. Setting Your Computer to RAID-Enabled Mode 1. Enter system setup (see page 109). 2. Press the up- and down-arrow keys to highlight Onboard Devices, and press . 3. Press the up- and down-arrow keys to highlight SATA Operation, and press . 4. Press the left- and right-arrow keys to highlight RAID On, and press . 5. If the setting was changed from RAID Autodetect/ATA to RAID On, a pop-up window displays. If the pop-up window displays, press the left- and right- arrow keys to highlight Yes, and press . If the setting didn't change, the pop-up window will not display. Go on to step 6.
-
 1
1 -
2
-
3
-
4
-
5
-
6
-
7
-
8
-
9
-
10
-
11
-
12
-
13
-
14
-
15
-
16
-
17
-
18
-
19
-
20
-
21
-
22
-
23
-
24
-
25
-
26
-
27
-
28
-
29
-
30
-
31
-
32
-
33
-
34
-
35
-
36
-
37
-
38
-
39
-
40
-
41
-
42
-
43
-
44
-
45
-
46
-
47
-
48
-
49
-
50
-
51
-
52
-
53
-
54
-
55
-
56
-
57
-
58
-
59
-
60
-
61
-
62
-
63
-
64
-
65
-
66
-
67
-
68
-
69
-
70
-
71
-
72
-
73
-
74
-
75
-
76
-
77
-
 78
78 -
 79
79 -
 80
80 -
 81
81 -
 82
82 -
 83
83 -
 84
84 -
 85
85 -
 86
86 -
 87
87 -
 88
88 -
89
-
90
-
91
-
92
-
93
-
94
-
95
-
96
-
97
-
98
-
99
-
100
-
101
-
102
-
103
-
104
-
105
-
106
-
107
-
108
-
109
-
110
-
111
-
112
-
113
-
114
-
115
-
116
 |
 |
