Dell Z9100 EMC PowerSwitch –ON Installation Guide March 2021 - Page 21
Two-post center-mount configuration, Two-post flush-mount configuration
 |
View all Dell Z9100 manuals
Add to My Manuals
Save this manual to your list of manuals |
Page 21 highlights
Figure 10. Two-post flush-mount configuration 2. Attach one rail to the front post flange with two user-supplied screws, item 2. 3. Slide the plunger bracket forward against the vertical post and secure the plunger bracket to the post flange with two user-supplied screws, item 3. 4. Repeat this procedure for the second rail. Two-post center-mount configuration CAUTION: Your switch is not NEBS Earthquake Z4-compliant if you use this installation method. 1. Slide the plunger bracket rearward until it clicks into place and secure the bracket to the front post flange with two user-supplied screws, item 1. Z9100-ON installation 21
-
 1
1 -
2
-
3
-
4
-
5
-
6
-
7
-
8
-
9
-
10
-
11
-
12
-
13
-
14
-
15
-
 16
16 -
 17
17 -
 18
18 -
 19
19 -
 20
20 -
 21
21 -
 22
22 -
 23
23 -
 24
24 -
 25
25 -
 26
26 -
27
-
28
-
29
-
30
-
31
-
32
-
33
-
34
-
35
-
36
-
37
-
38
-
39
-
40
-
41
-
42
-
43
-
44
-
45
 |
 |

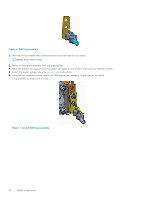
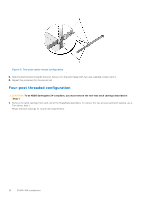
Figure 10. Two-post flush-mount configuration
2.
Attach one rail to the front post flange with two user-supplied screws, item 2.
3.
Slide the plunger bracket forward against the vertical post and secure the plunger bracket to the post flange with two
user-supplied screws, item 3.
4.
Repeat this procedure for the second rail.
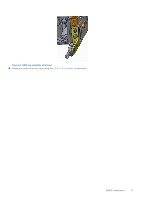
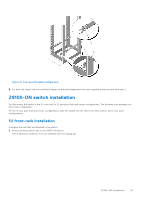
Two-post center-mount configuration
CAUTION:
Your switch is not NEBS Earthquake Z4-compliant if you use this installation method.
1.
Slide the plunger bracket rearward until it clicks into place and secure the bracket to the front post flange with two
user-supplied screws, item 1.
Z9100–ON installation
21