Dewalt DW712 Instruction Manual - Page 10
Cutting Base Molding Using The Bevel Feature - sliding compound miter saw
 |
View all Dewalt DW712 manuals
Add to My Manuals
Save this manual to your list of manuals |
Page 10 highlights
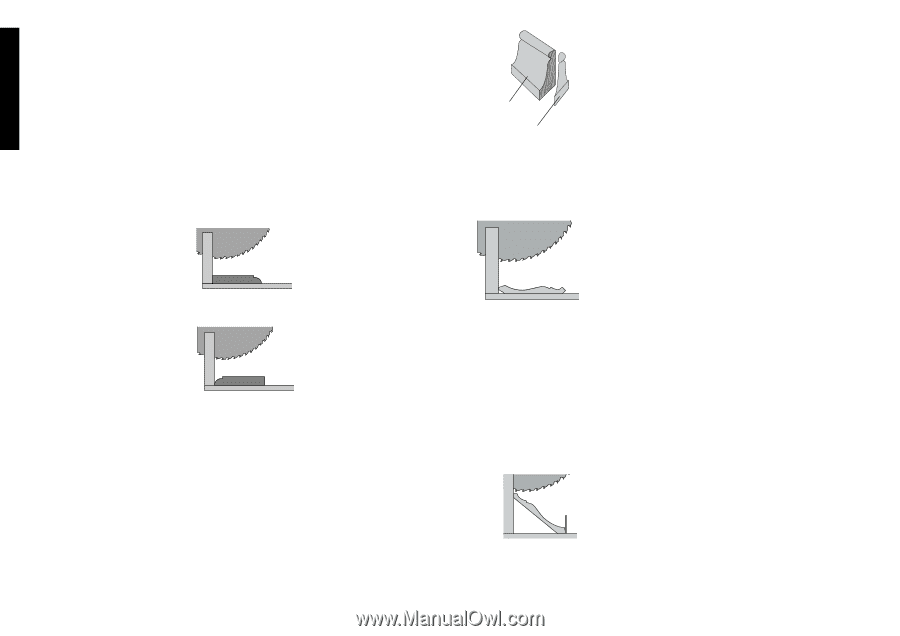
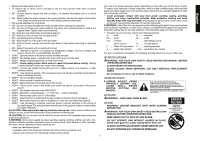
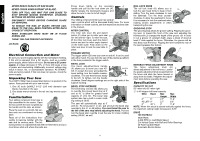
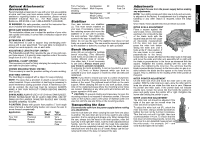
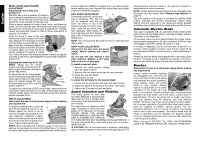
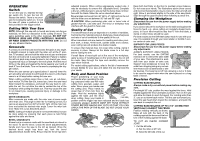
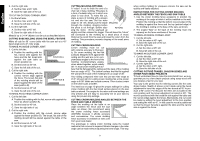
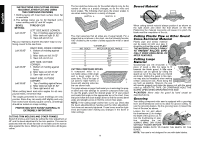
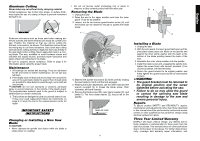
English 2. Cut the right side. A. Set the miter at 45° right. B. Save the right side of the cut. TO CUT AN OUTSIDE CORNER JOINT: 1. Cut the left side. A. Set the miter at 45° right. B. Save the left side of the cut. 2. Cut the right side. A. Set the miter at 45° left. B. Save the right side of the cut. Material up to 3-1/4" (82mm) can be cut as described above. CUTTING BASE MOLDING USING THE BEVEL FEATURE Make all cuts for 90˚ corner joints with the saw set at a 45° bevel angle and a 0° miter angle. TO MAKE AN INSIDE CORNER JOINT: 1. Cut the left side. A. Position the molding with the flat, narrow side against the fence and the flat, broad side against the saw table as shown (position A). POSITION A B. Set the bevel at 45° left. C. Save the left side of the cut. 2. Cut the right side. A. Position the molding with the curved, narrow edge against the fence. The broad, flat side of the molding should still be placed against the table of the saw (position B). POSITION B B. Set the bevel at 45° left C. Save the left side of the cut. TO MAKE AN OUTSIDE CORNER JOINT: 1. Cut the left side. A. Position the molding with the flat, narrow side against the fence as shown (position A). B. Set the bevel at 45° left. C. Save the right side of cut. 2. Cut the right side. A. Position the molding with the curved, narrow edge against the fence (position B). The broad, flat side of the molding should still be placed against the table of the saw. B. Set the bevel at 45° left. C. Save the right side of the cut. CUTTING MOLDING RETURNS A "return" is cut to finish the end of a chair rail or base molding. This piece is a form of outside miter cut in which one piece is very short. To make this cut, place a piece of molding with a square cut end into the saw. Set the miter angle to 45˚ left. Slowly pull the blade MOLDING through the molding, stopping before the piece is cut through. Before stop- RETURN ping the motor, lift the sawhead up slightly and then release the trigger. This will leave the "return" still connected to the molding by a small piece of wood. Remove the wood from the saw and break the return from the molding. This procedure prevents chipping of the small piece of molding. CUTTING CROWN MOLDING Crown molding must be cut with extreme accuracy to fit properly. On crown molding, the two flat surfaces designed to fit against the ceiling and the wall are cut in complementary angles to the front of the molding. Complementary angles, when added together, equal exactly 90°. In most crown molding the surface that fits flat against the ceiling and the back of the molding form an angle of 52˚. The bottom surface that fits flat against the wall and the back of the molding form an angle of 38˚. Your sliding compound miter saw has pre-set miter stops at 31.6° left and right for cutting crown molding flat at the proper angle to fit 90° inside and outside corners. There is also a mark on the bevel scale at 33.85°. The inset box on page 10 gives the proper settings for cutting crown molding with the flat, broad surface placed on the saw table as shown. The angles for the miter and bevel settings are very precise and are easy to accurately set on your saw by using the pre-set stop settings. CUTTING CROWN MOLDING ANGLED BETWEEN THE FENCE AND TABLE (NESTED) Place the molding on the table at an angle between the fence and the saw table, as shown. We recommend using the crown molding fence accessory (DW7084) because it affords accuracy and convenience. The crown molding fence accessory is available at extra cost from your local dealer. The advantage to cutting crown molding using the nested method is that no bevel is required. Minute changes in the miter angle can be made without adjusting the bevel angle. This way, when cutting molding for unsquare corners, the saw can be quickly and easily adjusted. INSTRUCTIONS FOR CUTTING CROWN MOLDING ANGLED BETWEEN THE FENCE AND SAW TABLE 1. Use the crown molding fence accessory to position the molding at the angle at which it will be installed on the wall. Position the molding so that the bottom (curved edge) of the molding is against the fence and the top (pointed edge) of the molding is resting on the base of the saw, as shown. 2. The angled "flats" on the back of the molding must rest squarely on the fence and base of the saw. TO MAKE AN INSIDE CORNER JOINT: 1. Cut the left side. A. Set the miter at 45° right. B. Save the right side of the cut. 2. Cut the right side. A. Set the miter at 45° left B. Save left side of the cut. TO MAKE AN OUTSIDE CORNER JOINT: 1. Cut the left side. A. Set the miter at 45° left. B. Save the right side of the cut. 2. Cut the right side. A. Set the miter at 45° right. B. Save the left side of cut. CUTTING PICTURE FRAMES, SHADOW BOXES AND OTHER FOUR-SIDED PROJECTS To best understand how to make the items listed here, we suggest that you try a few simple projects using scrap wood until you develop a feel for your saw. Your saw is the perfect tool for mitering corners like the ones shown below. Sketch A shows a joint made using the bevel adjustment to bevel the edges of the two boards at 45° to produce a 90° corner. For this joint the miter arm is locked in the zero position and the bevel adjustment is locked at 45°. The wood is positioned with the broad flat side against the table and the narrow edge against the fence. Alternatively, the cut could be made by setting the bevel adjustment to the zero position and setting the miter at 45˚. In this case the wood is positioned so that the broad, flat side is against the table and the narrow side is against the fence. 8
-
 1
1 -
2
-
3
-
4
-
 5
5 -
 6
6 -
 7
7 -
 8
8 -
 9
9 -
 10
10 -
 11
11 -
 12
12 -
 13
13 -
 14
14 -
 15
15 -
16
-
17
-
18
-
19
-
20
-
21
-
22
-
23
-
24
-
25
-
26
-
27
-
28
-
29
-
30
-
31
-
32
-
33
-
34
-
35
-
36
-
37
-
38
-
39
-
40
-
41
-
42
-
43
-
44
 |
 |