Dewalt DW712 Instruction Manual - Page 13
resulting in damage to the saw - parts
 |
View all Dewalt DW712 manuals
Add to My Manuals
Save this manual to your list of manuals |
Page 13 highlights
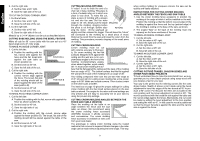
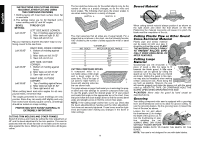
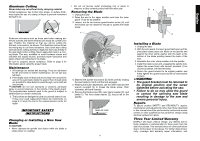
Aluminum Cutting Never make any cut without firmly clamping material. Certain workpieces, due to their size, shape, or surface finish, may require the use of a clamp or fixture to prevent movement during the cut. Aluminum extrusions such as those used when making aluminum screens and storm windows can easily be cut with your saw. Position the material so that you will be cutting the thinnest cross section, as shown. The illustration below shows the wrong way to cut these extrusions. Use a stick wax cutting lubricant when cutting aluminum. Apply the stick wax directly to the saw blade before cutting. Never apply stick wax to a moving blade. The wax, available at most hardware stores and industrial mill supply houses, provides proper lubrication and keeps chips from adhering to the blade. Be sure to properly secure workpiece. Refer to page 5 for information about using the proper blade. Maintenance 1. All bearings are sealed ball bearings. They are lubricated for life and need no further maintenance. Do not use any lubricant. 2. Periodically clean all dust and wood chips from around the area of the saw blade inside the guard. Even though slots are provided to allow debris to pass through, some dust will accumulate. CAUTION: Do not use lubricants or cleaners, particular spray or aerosol cleaners, in the vicinity of the plastic guard. The polycarbonate material used in the guard is subject to deterioration by certain chemicals. 3. The brushes are designed to give you several years of use. If they ever need replacement follow the instructions on page 6 or return the tool to the nearest service center for repair. IMPORTANT SAFETY INSTRUCTIONS Changing or Installing a New Saw Blade CAUTION: • Never depress the spindle lock button while the blade is under power or coasting. • Do not cut ferrous metal (containing iron or steel) or masonry or fiber cement product with this miter saw. Removing the Blade 1. Unplug the saw. 2. Raise the arm to the upper position and raise the lower guard (T) as far as possible. 3. Loosen, but do not remove guard bracket screw (U) until the bracket can be raised far enough to access the blade screw. T E U V 4. Depress the spindle lock button (E) while carefully rotating the saw blade by hand until the lock engages. 5. Keeping the button depressed, use the other hand and the wrench provided (V) to loosen the blade screw. (Turn clockwise, left-hand threads) 6. Remove the blade screw (W), outer clamp washer (X), and blade (Y). The inner clamp washer (Z), may be left on the spindle. REAR OF SAW 11 WX Y Z Installing a Blade 1. Unplug the saw. 2. With the arm raised, the lower guard held open and the pivot plate raised, place the blade on the spindle and against the inner clamp washer with the teeth at the bottom of the blade pointing toward the back of the saw. 3. Assemble the outer clamp washer onto the spindle. 4. Install the blade screw and, engaging the spindle lock, tighten the screw firmly with wrench provided. (Turn counterclockwise, left-hand threads) 5. Return the guard bracket to its original position and firmly tighten the guard bracket screw to hold bracket in place. WARNING: • The guard bracket must be returned to its original position and the screw tightened before activating the saw. • Failure to do so may allow the guard to contact the spinning saw blade resulting in damage to the saw and severe personal injury. Repairs To assure product SAFETY and RELIABILITY, repairs, maintenance and adjustments other than those described in this manual should be performed by authorized service centers or other qualified service personnel, always using identical replacement parts. Three Year Limited Warranty DEWALT will repair, without charge, any defects due to faulty materials or workmanship for three years from the date of purchase. This warranty does not cover part failure due to normal wear or tool abuse. For further detail of warranty coverage and warranty repair information, visit English
-
 1
1 -
2
-
3
-
4
-
5
-
6
-
7
-
 8
8 -
 9
9 -
 10
10 -
 11
11 -
 12
12 -
 13
13 -
 14
14 -
 15
15 -
 16
16 -
 17
17 -
 18
18 -
19
-
20
-
21
-
22
-
23
-
24
-
25
-
26
-
27
-
28
-
29
-
30
-
31
-
32
-
33
-
34
-
35
-
36
-
37
-
38
-
39
-
40
-
41
-
42
-
43
-
44
 |
 |
