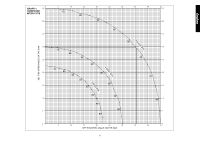
Dewalt DW712 Instruction Manual - Page 9
OPERATION, Switch, Cutting With Your Saw, Crosscuts, Clamping the Workpiece, Precision Cutting, - sliding compound saw
 |
View all Dewalt DW712 manuals
Add to My Manuals
Save this manual to your list of manuals |
Page 9 highlights
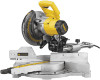
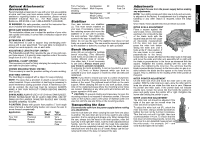
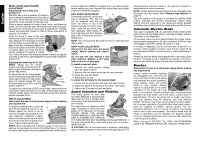
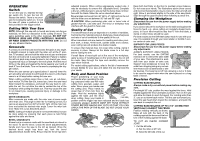
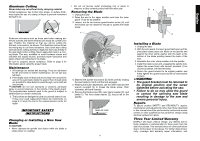
OPERATION Switch D To turn the saw on, depress the trigger switch (D). To turn the tool off, release the switch. There is no provision for locking the switch on. To lock the saw off, place a padlock in the hole provided in the trigger switch. Cutting With Your Saw NOTE: Although this saw will cut wood and many non-ferrous materials, we limit our discussion to the cutting of wood. The same guidelines apply to the other materials. DO NOT CUT FERROUS (IRON AND STEEL) MATERIALS, MASONRY, OR FIBER CEMENT PRODUCTS WITH THIS SAW. Do not use any abrasive blades. Crosscuts A crosscut is one that cuts wood across the grain at any angle. A straight crosscut is made with the miter arm at the 0° position. To crosscut, set and lock the miter arm at zero and ensure that the rail lock knob is securely tightened. Failure to tighten the rail lock knob may cause the saw to turn toward you, causing personal injury or damage to the work piece. Hold the wood firmly on the table and against the fence keeping your hand at least 6" from the blade. Turn on the saw by squeezing the trigger switch. When the saw comes up to speed (about 1 second) lower the arm smoothly and slowly to cut through the wood. Let the blade come to a full stop before raising the saw arm. When cutting anything larger than a 2x3, use an out-downback motion. Pull the saw out, toward you, lower the saw head down toward the workpiece, and push the saw back to complete the cut. Do not allow the saw to contact the top of the workpiece while pulling the blade out. This may cause the saw to run toward you, causing personal injury or damage to the workpiece. MITER CROSSCUTS Miter crosscuts are made with the miter arm at some angle other than zero. This angle is often 45° for making corners, but can be set anywhere from 50° left to 60° right. Lift the miter lock lever and select the desired miter angle. Lower the miter lock lever. Make the cut as described above. NOTE: Cutting of multiple pieces is not recommended, but can be done safely by ensuring that each piece is held firmly against the table and fence. BEVEL CROSSCUTS A bevel cut is a crosscut made with the saw blade at a bevel to the wood. To set the bevel, unlock the bevel adjustment/lock handle and move the saw to the left as desired. Once the desired bevel angle has been set, lock the bevel adjustment/lock handle firmly. Ensure that the fence has been adjusted properly. When cutting aggressively angled cuts, it may be necessary to remove the adjustable fence. Complete a dry run, without power to ensure that the fence does not interfere with the blade. Make the cut as described above. Bevel angles can be set from 48° left to -2° right and can be cut with the miter arm set between 50° left and 60° right. CAUTION: When performing miter cuts or bevel cuts of greater than 60˚, use extra care. The fence or workpiece may interfere with the guard in these cuts. Quality of Cut The smoothness of any cut depends on a number of variables. Factors like the material being cut, blade type, blade sharpness and rate of cut all contribute to the quality of the cut. When smoothest cuts are desired for molding and other precision work, a sharp, 40-60 tooth, carbide blade and a slower, even cutting rate will produce the desired results. To ensure that material does not creep while cutting, clamp it securely in place. Always let the blade come to a full stop before raising the arm. If small fibers of wood split out at the rear of the workpiece, apply a piece of masking tape on the wood where the cut will be made. Saw through the tape and carefully remove the tape when finished. For varied cutting applications, refer to the list of recommended saw blades for your saw and select the one that best fits your needs. Body and Hand Position Proper positioning of your body and hands when operating the slid- ing compound miter saw will make cutting more accurate, easier, and safer. Never place your hands near the cutting area. Place hands no closer than 6" (152 mm) from the blade. Hold the workpiece tightly against the table and the fence when cutting. Keep your hands in 6" (152 MM) position until the trigger has been released and the blade has completely stopped. ALWAYS MAKE DRY RUNS WITHOUT POWER BEFORE MAKING ANY CUTS SO THAT YOU CAN CHECK THE PATH OF THE BLADE. DO NOT CROSS YOUR HANDS. CORRECT INCORRECT 7 Keep both feet firmly on the floor to maintain proper balance. Do not cross your hands. The illustrations above show correct and incorrect hand position. As you move the miter arm left and right, follow it and stand slightly to the side of the saw blade. Sight through the guard louvers when following a pencil line. Clamping the Workpiece Disconnect the saw from the power supply before making any adjustments. If you cannot secure the workpiece on the table and against the fence by hand, e.g., when cutting an irregularly shaped workpiece, or if your hand would be less than 6" from the blade, a clamp or other fixture should be used. For best results use the DW7082 clamp made for use with your saw. It is available through your local retailer or DEWALT service center at extra cost. SUPPORT FOR LONG PIECES Disconnect the saw from the power supply before making any adjustments. ALWAYS SUPPORT LONG PIECES. For best results, use the DW7080 extension kit to extend the table width of your saw. This attachment is available from your dealer at extra cost. Support long workpieces to keep the ends from dropping using any convenient means such as sawhorses or similar devices. The base top is 3.5" tall, allowing a 4x4 or 2-2x4s to be used to support work when the saw is placed on a long table or bench. Precision Cutting CUTTING BASE MOLDING Always make a dry run without power before making any cuts. For straight 90° cuts, position the wood against the fence. Hold it tightly against the fence and table as shown. Turn on the saw and allow the blade to reach full speed. For molding wider than 3", use an out-down-back motion. Pull the saw out toward you, lower the saw head down toward the workpiece, and push the saw back to complete the cut. CUTTING BASE MOLDING UP TO 3-1/4" (82 MM) HIGH VERTICALLY AGAINST THE FENCE Position molding vertically as shown. Make all cuts with the back of the molding against the fence and the bottom of the molding against the base. TO CUT AN INSIDE CORNER JOINT: 1. Cut the left side. A. Set the miter at 45° left. B. Save the left side of the cut. English
-
 1
1 -
2
-
3
-
 4
4 -
 5
5 -
 6
6 -
 7
7 -
 8
8 -
 9
9 -
 10
10 -
 11
11 -
 12
12 -
 13
13 -
 14
14 -
15
-
16
-
17
-
18
-
19
-
20
-
21
-
22
-
23
-
24
-
25
-
26
-
27
-
28
-
29
-
30
-
31
-
32
-
33
-
34
-
35
-
36
-
37
-
38
-
39
-
40
-
41
-
42
-
43
-
44
 |
 |
