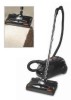
Dirt Devil M082476 Revision 2 (4/2003) - Page 8
Removal, Replacement
 |
View all Dirt Devil M082476 manuals
Add to My Manuals
Save this manual to your list of manuals |
Page 8 highlights
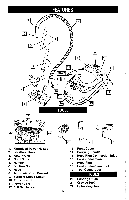
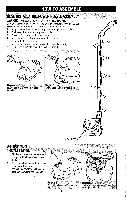
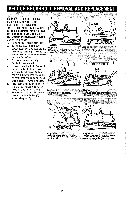
BAG REMOVAL AND REPLACEMENT BAG. REMOVAL: WARNING: TO REDUCE THE RISK OF INJURY FROM MOVING PARTS UNPLUG CLEANER BEFORE SERVICING. 1. When the full bag indicator turns red, you must replace your bag. 2. Remove the hose by pressing the 2 buttons at the end of the hose and pull upward. 3. Pull up on the front cover (Diagram 1). 4. Lift out bag chamber with bag attached, by pulling on the bag Diagram 1 Lift front cover. chamber handle (Diagram 2). 5. Remove full bag from chamber by pressing the release latch (hinge) of the bag chamber (Diagram 3). 2. Diagram2 Remove bag chamber. 3. RELEASE LATCH (HINGE) BAG REPLACEMENT: BAG TYPE: R Insert a new bag into bag chamber by inserting the "THIS SIDE DOWN" portion of the bag collar into the bag guides (Diagram 1). Secure in place by locking the bag collar under the release latch (hinge). BAG GUIDES 2. Return bag and bag chamber to Diagram 1 the cleaner by sliding the large tab Replace bag to chamber. of the bag chamber into the cham- ber guides (Diagram 2). 3. Close front cover. NOTE: If bag is not installed correctly - cover will 3. not close. CORRECT 4. Before re-connecting hose, be sure the inlet opening of the dust bag is properly aligned with the opening of hose connection (Diagram 3). 5. Reconnect hose. Diagram 3 Remove hag hi pressing the release latch. 2. a 01 CHAMBER GUIDES Diagram 2 Retnrilibau itir, bag chamber into chamber quirts. INCORRECT Diagrim 3 8e sure inlet opening of the dusting bag is properly aligned avith opening of hose connection. 8
-
 1
1 -
2
-
 3
3 -
 4
4 -
 5
5 -
 6
6 -
 7
7 -
 8
8 -
 9
9 -
 10
10 -
 11
11 -
 12
12 -
 13
13 -
14
-
15
-
16
-
17
-
18
-
19
-
20
-
21
-
22
-
23
-
24
-
25
-
26
-
27
-
28
-
29
-
30
-
31
-
32
-
33
-
34
-
35
-
36
 |
 |
