Dynex DX-19LD150A11 User Manual (English) - Page 9
TV/DVD combo components - usb
 |
UPC - 600603127182
View all Dynex DX-19LD150A11 manuals
Add to My Manuals
Save this manual to your list of manuals |
Page 9 highlights
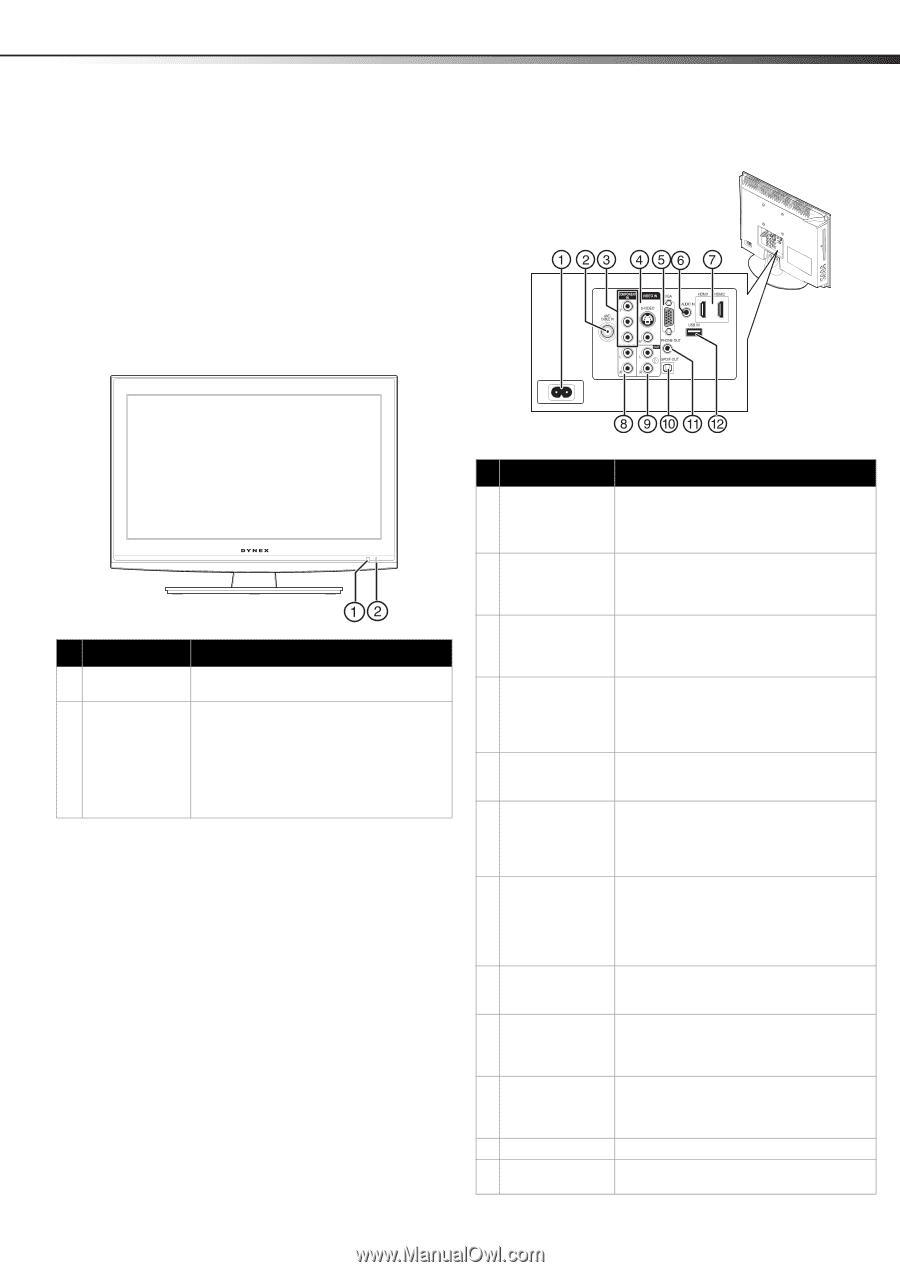
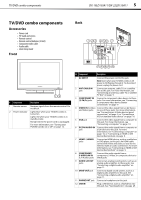
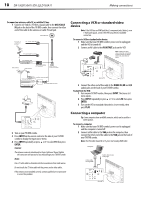
TV/DVD combo components DX-19LD150A11/DX-22LD150A11 5 TV/DVD combo components Accessories • Power cord • TV stand and screws • Remote control • Remote control batteries (2 AAA) • Component video cable • Audio cable • Quick Setup Guide Front Back PC/DVI PB PR # Component Description 1 Remote sensor Receives signals from the remote control. Do not block. 2 Power indicator Lights blue when your TV/DVD combo is turned on. Lights red when your TV/DVD combo is in standby mode. No light when the power cord is unplugged. For more information, see "Turning your TV/DVD combo on or off" on page 12. ## Component Description 1 AC INPUT 2 ANT/CABLE IN jack Connect the power cord to this jack. Note: Even when your TV/DVD combo is off, power is still flowing through it. To disconnect power, unplug the power cord. Connect an antenna, cable TV, or a satellite box to this jack. For more information, see "Connecting an antenna, cable TV, or satellite TV box" on page 9. 3 COMPONENT IN (Y, Pb,Pr) jacks Connect a component video device to these jacks. For more information, see "Connecting a component video device (better connection)" on page 9. 4 VIDEO IN (S-Video Connect the video signal from an AV device and Video) jacks to one of these jacks. For more information, see "Connecting an S-Video device (good connection)" on page 9, or "Connecting a VCR or standard video device" on page 10. 5 VGA jack Connect the video signal from a computer to this jack. For more information, see "Connecting a computer" on page 10. 6 PC/DVI AUDIO IN Connect the audio signal from a computer or jack a DVI device to this jack. For more information, see "Connecting a computer" on page 10, or "Connecting an HDMI or DVI device (best picture) on page 9. 7 HDMI1 / HDMI2 jacks Connect an HDMI device, such as a cable box or DVD player, to this jack. An HDMI cable carries both video and audio, so you do not need to make an audio connection. For more information, see "Connecting an HDMI or DVI device (best picture)" on page 9. 8 COMPONENT/ S-VIDEO/AV IN (L/R Audio) jacks 9 AUDIO L/R OUT jacks Connect the audio signals from a component, S-Video, or composite device to these jacks. Connect an analog sound system, such as an analog audio amplifier, to these jacks. See "Connecting a digital audio amplifier" on page 11. 10 SPDIF OUT jack 11 PHONE OUT jack Connect a digital sound system, such as a digital audio amplifier, to this jack. See "Connecting a digital audio amplifier" on page 11. Connect a headphone to this jack. 12 USB IN Plug a USB device, such as a flashdrive, into this jack. See "Viewing photos" on page 29.
-
 1
1 -
2
-
3
-
 4
4 -
 5
5 -
 6
6 -
 7
7 -
 8
8 -
 9
9 -
 10
10 -
 11
11 -
 12
12 -
 13
13 -
 14
14 -
15
-
16
-
17
-
18
-
19
-
20
-
21
-
22
-
23
-
24
-
25
-
26
-
27
-
28
-
29
-
30
-
31
-
32
-
33
-
34
-
35
-
36
-
37
-
38
-
39
-
40
-
41
 |
 |