Dynex DX32E250A12 User Manual
Dynex DX32E250A12 Manual
 |
View all Dynex DX32E250A12 manuals
Add to My Manuals
Save this manual to your list of manuals |
Dynex DX32E250A12 manual content summary:
- Dynex DX32E250A12 | User Manual - Page 1
32 LED-LCD TV DX-32E250A12 USER GUIDE - Dynex DX32E250A12 | User Manual - Page 2
ii Dynex DX-32E250A12 32" LED-LCD TV Contents CHILD SAFETY 1 Important safety instructions 2 Warnings 2 Cautions 2 Installing the stand or wall-mount bracket 4 Installing the stand 4 Installing a wall-mount bracket 4 TV components 5 Package contents 5 Front 5 Back and Side 5 Remote - Dynex DX32E250A12 | User Manual - Page 3
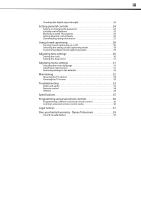
menu language 31 Labeling an input source 31 Restoring settings to the defaults 32 Maintaining 32 Cleaning the TV cabinet 32 Cleaning the TV screen 32 Troubleshooting 33 Video and audio 33 Remote control 34 General 34 Specifications 35 Programming universal remote controls 36 Programming - Dynex DX32E250A12 | User Manual - Page 4
iv - Dynex DX32E250A12 | User Manual - Page 5
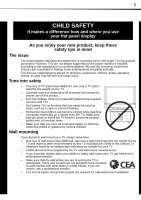
trend, and larger TVs are popular purchases. However, TVs are not always supported on the proper stands or installed according to • One size of TV stand does not fit all. Use only a TV stand rated for the weight of your TV. • Carefully read and understand all enclosed instructions for proper use of - Dynex DX32E250A12 | User Manual - Page 6
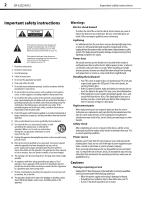
2 DX-32E250A12 Important safety instructions Important safety instructions This symbol indicates that dangerous voltage constituting a risk of electric shock is present within your TV. This label is located on the back of your TV. This symbol indicates that there are important operating and - Dynex DX32E250A12 | User Manual - Page 7
Important safety instructions DX-32E250A12 3 • If your TV does not operate normally by following the operating instructions. Adjust only those controls that are covered by the operating instructions because incorrect adjustment of other controls may result in damage and will often require - Dynex DX32E250A12 | User Manual - Page 8
provided screws. Model DX-32E250A12 Screw type Screw length T4 type 25 mm 3 Secure the flat stand cover to the back of your TV using the four screws you just removed. Note The length of the wall-mount screws vary depending on the wall-mount bracket you purchased. See the instructions that came - Dynex DX32E250A12 | User Manual - Page 9
TV components TV components Package contents Remote control and batteries (2 AAA) Stand with screws Composite cable Quick Setup Guide Front DX-32E250A12 5 Back and Side # Item 1 VOL+/VOL- 2 CH /CH 3 MENU 4 INPUT 5 (power) Description Press to increase or decrease the volume. Press to go to the - Dynex DX32E250A12 | User Manual - Page 10
6 DX-32E250A12 TV components Remote control # Button 5 ENTER 6 MENU 7 VOL +/VOL - 8 MUTE 9 ZOOM 10 PICTURE 11 SLEEP 12 AUDIO 13 (power) 14 RECALL 15 GUIDE 16 17 EXIT 18 CH +/CH- 19 FAVORITE 20 Video input 21 CH-LIST 22 CCD # Button 1 INPUT 2 Numbers 3 4 INFO Description Press to open the - Dynex DX32E250A12 | User Manual - Page 11
DX-32E250A12 7 Making connections What connection should I use? Your TV has several connection types for connecting devices to your TV. For the best video quality, you should connect a device to the best available connection. Use the following tables to identify cables: Connection Video - Dynex DX32E250A12 | User Manual - Page 12
8 DX-32E250A12 Making connections Connecting a cable or satellite box Many cable or satellite TV boxes have more than one connection type. To get the best video, you should use the best connection type available. For more information, see "What connection should I use?" on page 7. Notes: • If the - Dynex DX32E250A12 | User Manual - Page 13
connections DX-32E250A12 9 Using component video (better) To connect a cable or satellite box using component video: 1 Turn off your TV and all connected equipment. 2 Connect the incoming cable from the cable wall jack to the cable-in jack on the cable box. 3 Connect a component video cable (not - Dynex DX32E250A12 | User Manual - Page 14
10 DX-32E250A12 Making connections Using coaxial (good) To connect a cable or satellite box using coaxial: 1 Turn off your TV and all connected equipment. 2 Connect the incoming cable from the cable wall jack to the cable-in jack on the cable or satellite box. 3 Connect a coaxial cable (not - Dynex DX32E250A12 | User Manual - Page 15
DX-32E250A12 11 Connecting a DVD or Blu-ray player Using HDMI (best) To connect a DVD or Blu-ray player using HDMI: 1 Make sure that your TV's power cord is unplugged and the DVD or Blu-ray player is turned off. 2 Connect an HDMI cable (not included) to an HDMI jack on the back of your TV - Dynex DX32E250A12 | User Manual - Page 16
DX-32E250A12 Making connections Using component video (better) To connect a DVD or Blu-ray player using component video: 1 Make sure that your TV's power cord is unplugged and the DVD or Blu-ray player is turned off. 2 Connect a component video cable (not included) to the Y/PB/PR (component video - Dynex DX32E250A12 | User Manual - Page 17
Making connections DX-32E250A12 13 Connecting a VCR To connect a VCR: 1 Make sure that your TV's power cord is unplugged and the VCR is turned off. 2 Connect a composite cable (included) to the Y/VIDEO and L/R (audio in) jacks on the side of your TV and to the AV OUT jacks on the VCR. Note When - Dynex DX32E250A12 | User Manual - Page 18
14 DX-32E250A12 Making connections Connecting a computer Tip Some computers have an HDMI jack. You can use an HDMI cable to connect the computer for a better picture. Using VGA To connect a computer using VGA: 1 Make sure that your TV's power cord is unplugged and the computer is turned off. 2 - Dynex DX32E250A12 | User Manual - Page 19
Making connections DX-32E250A12 15 Connecting a USB flash drive This TV does not support .JPEG or .JPG files. The USB port is for firmware upgrades only. To connect a USB flash drive: • Plug a USB flash drive into the SERVICE PORT on the side of your TV. Connecting a basic home theater system - Dynex DX32E250A12 | User Manual - Page 20
the + and - symbols in the battery compartment. AV receiver 3 Replace the battery cover. Game console or camera USB flash drive Computer Antenna or cable TV connected directly to the wall jack The connections you make depend on the video and audio jacks available on your devices. Refer to the - Dynex DX32E250A12 | User Manual - Page 21
Turning on your TV for the first time DX-32E250A12 17 Turning on your TV for the first time The first time you turn on your TV, the Setup Wizard opens. The Setup Wizard guides you through setting up basic settings including the menu language, time setting, picture mode, TV signal source, and the - Dynex DX32E250A12 | User Manual - Page 22
18 DX-32E250A12 Understanding the basics Understanding the basics Turning your TV on or off To turn your TV on or off: 1 Make sure that the power cord is connected to a power outlet. 2 Press (power) to turn on your TV. The power indicator LED turns off. 3 Press (power) again to turn off your TV. - Dynex DX32E250A12 | User Manual - Page 23
DX-32E250A12 , and resolution. • Press GUIDE to show the digital program guide, which may view a list and sharpness. This selection is good for video games, animation, and in bright light light, your TV uses less energy. • Custom-(customized picture). Lets you manually adjust picture settings such as - Dynex DX32E250A12 | User Manual - Page 24
20 DX-32E250A12 Adjusting the picture • Color-Adjusts the color intensity of the picture. A low setting may make the color look faded. A high setting may make the color look artificial. • Tint-Adjusts the color balance of the picture. Use this control to make skin tones look more natural. • - Dynex DX32E250A12 | User Manual - Page 25
Adjusting the sound DX-32E250A12 21 Adjusting the sound Adjusting sound settings To adjust sound settings: 1 Press MENU. The on-screen menu opens. Playing TV audio only You can turn off the picture on your TV and listen to the program audio only. To play TV audio only: 1 Press MENU. The on-screen - Dynex DX32E250A12 | User Manual - Page 26
22 DX-32E250A12 Changing channel settings Changing channel settings Automatically scanning for channels When you scan for channels, your TV searches for channels with signals and stores the channel information in the channel list. When you press CH + or CH -, your TV goes to the next or previous - Dynex DX32E250A12 | User Manual - Page 27
Changing channel settings DX-32E250A12 23 4 -4 KCET-W PICTURE AUDIO SETTINGS CHANNELS Ch 11-1 WXIA-DT Ch 28-1 KCET-HD Ch 28-3 KCET-Vm Ch 35-1 WHD-TV 4 Press or to Select Menu Back Manually add and skip channels in your program list Exit Exit 10-0 PICTURE AUDIO SETTINGS CHANNELS A Move - Dynex DX32E250A12 | User Manual - Page 28
24 DX-32E250A12 Setting parental controls 4 strength to determine if you need to adjust your antenna or digital cable input. The higher the signal strength, the less likely you are Settings Input Labels Computer Settings Component Settings PICTURE AUDIO SETTINGS CHANNELS Move Select Set TV - Dynex DX32E250A12 | User Manual - Page 29
DX-32E250A12 25 5 Press or to highlight Change Password, then press ENTER. The password entry screen opens. PICTURE Enter Old Password * * Enter New Password Confirm New Password AUDIO SETTINGS CHANNELS 3 Press ENTER. The Enter Password screen opens. Enter Password PICTURE AUDIO SETTINGS - Dynex DX32E250A12 | User Manual - Page 30
26 DX-32E250A12 Setting parental controls 3 Press ENTER. The Enter Password screen opens. Enter Password PICTURE AUDIO SETTINGS CHANNELS 3 Press ENTER. The Enter Password screen opens. Enter Password PICTURE AUDIO SETTINGS CHANNELS Move Select Menu Back Enter your 4-digit password. - Dynex DX32E250A12 | User Manual - Page 31
Setting parental controls DX-32E250A12 27 7 Press or press Note: When you block a rating, that rating higher ratings are blocked. 8 Press EXIT to close the menu. U.S. TV ratings (age-based) NONE TV-Y TV-Y7 TV-G TV-PG TV-14 TV-MA Not rated All children Children over seven years of age General - Dynex DX32E250A12 | User Manual - Page 32
28 DX-32E250A12 Using closed captioning 4 Press the number buttons to enter the four-digit password. The SETTINGS-Parental Controls menu opens. 3 Press or to highlight Closed Caption, then press ENTER. The SETTINGS-Closed Caption menu opens. PICTURE Button Lock Block Unrated TV USA Parental - Dynex DX32E250A12 | User Manual - Page 33
captioning DX-32E250A12 29 3 Press or to highlight Closed Caption, then press ENTER. The menu opens. Caption Control Analog Caption Digital Caption Digital CC Settings PICTURE AUDIO SETTINGS CHANNELS CC On When Mute CC1 CS1 Move Select Menu Back Turn Closed Captioning on when the TV is set - Dynex DX32E250A12 | User Manual - Page 34
30 DX-32E250A12 Adjusting time settings 7 Press or to highlight Mode, then press or to select Custom. Note To reset the close caption styles to their defaults, set Mode to Default. 8 Press or to highlight a style, then press or to adjust the style. You can select: • Font Style-Selects the font - Dynex DX32E250A12 | User Manual - Page 35
Adjusting menu settings DX-32E250A12 31 Setting the sleep timer You can specify the amount of time before your TV automatically turns off. To set the sleep timer: 1 Press MENU. The on-screen menu opens. Adjusting menu settings Selecting the menu language To select the menu language: 1 Press MENU. - Dynex DX32E250A12 | User Manual - Page 36
32 DX-32E250A12 Maintaining 2 Press or to highlight SETTINGS, then press . The SETTINGS menu opens. Parental Controls Closed Caption Time Menu Settings Input Labels Computer Settings Component Settings PICTURE AUDIO SETTINGS • Do not use your TV in areas that are too hot or too cold - Dynex DX32E250A12 | User Manual - Page 37
Troubleshooting DX-32E250A12 33 Troubleshooting Warning Do not try to repair your TV yourself. Contact authorized service personnel. Video and audio Problem Solution Picture does not fill the screen. There are black bars around the picture. No picture (screen is not lit) and no sound. Dark, - Dynex DX32E250A12 | User Manual - Page 38
34 DX-32E250A12 Troubleshooting Problem Solution Audio noise • Other devices (for example, surround sound receiver, external speakers, fans, or hair dryers) may be interfering with your TV. Try turning off one device at a time to determine which device is causing interference. After you have - Dynex DX32E250A12 | User Manual - Page 39
768/70Hz, 1024 × 768/75Hz, 1280 × 768/60Hz, 1360 × 768/60Hz Tuner Analog Digital NTSC ATSC, 8-VSB, Clear-QAM Inputs Outputs HDMI Component video Composite video Shared audio (component and composite) S-Video PC/VGA 3.5mm PC audio input DVI USB 2 (back) E-EDID compliant HDCP compliant 1 (side - Dynex DX32E250A12 | User Manual - Page 40
, you can manually program it using the Dynex TV remote to "teach" the commands one at a time. See your universal remote control's instructions for details. For more help, go to www.Dynexproducts.com/remotecodes or call technical support for your universal remote control or set-top box manufacturer - Dynex DX32E250A12 | User Manual - Page 41
instructions /TV user's authority to operate this equipment. Cables Connections to this device must be made with shielded cables Dynex support line at 1-800-305-2204. This source code is available for a period of three (3) years from the date of the distribution of this product by Dynex. DX-32E250A12 - Dynex DX32E250A12 | User Manual - Page 42
38 DX-32E250A12 Legal notices - Dynex DX32E250A12 | User Manual - Page 43
APPLY TO YOU. THIS WARRANTY GIVES YOU SPECIFIC LEGAL RIGHTS, AND YOU MAY ALSO HAVE OTHER RIGHTS, WHICH VARY FROM STATE TO STATE OR PROVINCE TO PROVINCE. Contact Dynex: For customer service please call 1-800-305-2204 www.Dynexproducts.com Distributed by Best Buy Purchasing, LLC 7601 Penn Avenue South - Dynex DX32E250A12 | User Manual - Page 44
www.dynexproducts.com US and Canada Market - (800) 305-2204 Distributed by Best Buy Purchasing, LLC 7601 Penn Ave. South, Richfield, MN 55423 U.S.A. © 2011 BBY Solutions, Inc. All rights reserved. DYNEX is a trademark of BBY Solutions, Inc. Registered in some countries. All other products and brand
-
 1
1 -
 2
2 -
 3
3 -
 4
4 -
 5
5 -
 6
6 -
 7
7 -
8
-
9
-
10
-
11
-
12
-
13
-
14
-
15
-
16
-
17
-
18
-
19
-
20
-
21
-
22
-
23
-
24
-
25
-
26
-
27
-
28
-
29
-
30
-
31
-
32
-
33
-
34
-
35
-
36
-
37
-
38
-
39
-
40
-
41
-
42
-
43
-
44
 |
 |

32
LED-LCD TV
DX-32E250A12
USER GUIDE