Dynex DX32E250A12 User Manual - Page 24
Adjusting the computer image
 |
View all Dynex DX32E250A12 manuals
Add to My Manuals
Save this manual to your list of manuals |
Page 24 highlights
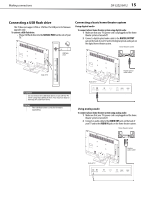
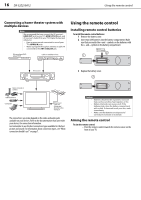
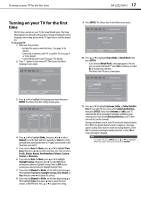
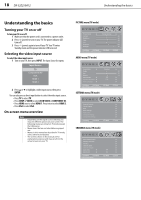
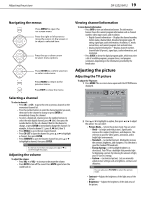
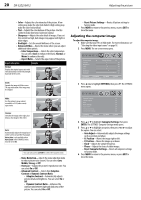
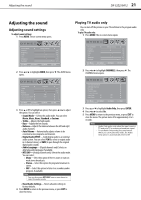
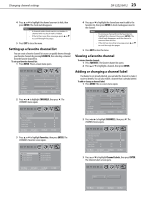
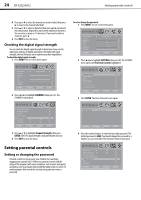
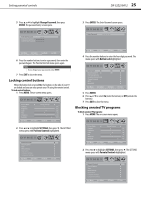
20 DX-32E250A12 Adjusting the picture • Color-Adjusts the color intensity of the picture. A low setting may make the color look faded. A high setting may make the color look artificial. • Tint-Adjusts the color balance of the picture. Use this control to make skin tones look more natural. • Sharpness-Adjusts the color detail of images. If you set this control too high, dark images may appear with light or white edges. • Backlight-Sets the overall brilliance of the screen. • Advanced Video-Opens the menu where you can adjust additional video options. • Color Temperature-Selects the color temperature. You can select Cool (to enhance the blues), Normal, or Warm (to enhance the reds). • Aspect Ratio-Selects the aspect ratio of the picture. Aspect ratio option Example Normal: Displays the original aspect ratio with vertical black bars on the left and right hand side of the screen. Zoom: Expands the image to fill the screen. The top and bottom of the image may be cropped. • Reset Picture Settings-Resets all picture settings to factory mode. 3 Press MENU to return to the previous menu, or press EXIT to close the menu. Adjusting the computer image To adjust the computer image: 1 Make sure that your TV is in VGA mode. For more information, see "Selecting the video input source" on page 18. 2 Press MENU. The on-screen menu opens. Picture Mode Contrast Brightness Color Tint Sharpness Backlight PICTURE AUDIO SETTINGS CHANNELS Energy Savings 50 50 58 0 +10 43 Move Select Menu Back Adjust settings to affect picture quality Exit Exit 3 Press or to highlight SETTINGS, then press . The SETTINGS menu opens. Wide: Use this option to view content recorded in a 16:9 (wide-screen) aspect ratio. Cinema: Stretches the image at the edges, but keeps a clear image in the center. Auto: Automatically adjusts the image based on the screen size and the TV program. Note: Auto is only available when Auto Zoom in the CHANNELS menu must be set to On. Note You can also press ZOOM to select the aspect ratio. • Noise Reduction-Selects the noise reduction mode to reduce picture noise (snow). You can select Low, Middle, Strong, or Off. • Overscan-Adjusts the picture's reproduction rate. You can select On or Off. • Advanced Contrast-Selects from Adaptive Contrast or Dynamic Contrast Ratio. • Adaptive Contrast-Automatically adjusts picture detail and brightness. You can select On or Off. • Dynamic Contrast Ratio-Enhances the contrast ratio between light and dark areas of the picture. You can select On or Off. Parental Controls Closed Caption Time Menu Settings Input Labels Computer Settings Component Settings PICTURE AUDIO SETTINGS CHANNELS Move Select Set various TV options Menu Back Exit Exit 4 Press or to highlight Computer Settings, then press ENTER. The SETTINGS-Computer Settings menu opens. 5 Press or to highlight an option, then press or to adjust the option. You can select: • Auto Adjust-Automatically adjusts the image settings such as position and phase. • H. Position-Moves the image right or left. • V. Position-Moves the image up or down. • Clock-Adjusts the sample frequency. • Phase-Adjusts the focus of stable images. • Reset Computer Settings-Resets all computer settings to factory mode. 6 Press MENU to return to the previous menu, or press EXIT to close the menu.
-
 1
1 -
2
-
3
-
4
-
5
-
6
-
7
-
8
-
9
-
10
-
11
-
12
-
13
-
14
-
15
-
16
-
17
-
18
-
 19
19 -
 20
20 -
 21
21 -
 22
22 -
 23
23 -
 24
24 -
 25
25 -
 26
26 -
 27
27 -
 28
28 -
 29
29 -
30
-
31
-
32
-
33
-
34
-
35
-
36
-
37
-
38
-
39
-
40
-
41
-
42
-
43
-
44
 |
 |
