Epson 1520 User Manual - Epson Stylus RIP Mac & PC - Page 33
Sending the Print Job, from the File menu. The Adobe
 |
UPC - 010343813328
View all Epson 1520 manuals
Add to My Manuals
Save this manual to your list of manuals |
Page 33 highlights
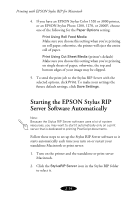
Printing with EPSON Stylus RIP for Macintosh Sending the Print Job To print a document from an application, follow these steps: 1. Open the document you want to print in your application. 2. Select Page Setup from the File menu. The Adobe Page Setup dialog box appears. Set the print options for your document and click OK. 3. Once you have set up the page, select Print from the File menu. The following dialog box appears: Click here to select different categories of print job options; see page 2-10 Click here to save the current settings as the default settings Click here to print your document 4. Select the number of copies, page range, and paper source you want. Make sure the Destination option is set to Printer, not File. If you want to use the "drag and drop" printing method described on page 2-15, select File instead, and make sure you print to a "PS," not "EPS," file. To set options for your print job, choose a print job option category from the General pop-up menu. See page 2-10. 5. Click Print. The application sends the print job to the Stylus RIP Server software for processing and printing. 2-9
-
 1
1 -
2
-
3
-
4
-
5
-
6
-
7
-
8
-
9
-
10
-
11
-
12
-
13
-
14
-
15
-
16
-
17
-
18
-
19
-
20
-
21
-
22
-
23
-
24
-
25
-
26
-
27
-
 28
28 -
 29
29 -
 30
30 -
 31
31 -
 32
32 -
 33
33 -
 34
34 -
 35
35 -
 36
36 -
 37
37 -
 38
38 -
39
-
40
-
41
-
42
-
43
-
44
-
45
-
46
-
47
-
48
-
49
-
50
-
51
-
52
-
53
-
54
-
55
-
56
-
57
-
58
-
59
-
60
-
61
-
62
-
63
-
64
-
65
-
66
-
67
-
68
-
69
-
70
-
71
-
72
-
73
-
74
-
75
-
76
-
77
-
78
-
79
 |
 |
