Epson 1520 User Manual - Epson Stylus RIP Mac & PC - Page 51
At the Add Printer Wizard PPD List dialog box, highlight, At the Install from Disk dialog box, click
 |
UPC - 010343813328
View all Epson 1520 manuals
Add to My Manuals
Save this manual to your list of manuals |
Page 51 highlights
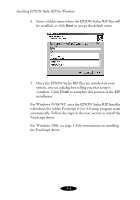
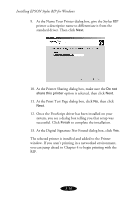
Installing EPSON Stylus RIP for Windows 5. At the Select the Printer Port dialog box, make sure the Use the following port option is selected, then choose StylusRIP: EPSON StylusRIP from the port list, and click Next. 6. At the Add Printer Wizard dialog box, click Have Disk. 7. At the Install from Disk dialog box, click Browse and select (CD-ROM drive):\PPD2000\USA\OEMSETUP.EXE. Then click Open and click OK. 8. At the Add Printer Wizard PPD List dialog box, highlight the PPD file that corresponds to your printer model and click Next. Click here to select your printer 3-9
-
 1
1 -
2
-
3
-
4
-
5
-
6
-
7
-
8
-
9
-
10
-
11
-
12
-
13
-
14
-
15
-
16
-
17
-
18
-
19
-
20
-
21
-
22
-
23
-
24
-
25
-
26
-
27
-
28
-
29
-
30
-
31
-
32
-
33
-
34
-
35
-
36
-
37
-
38
-
39
-
40
-
41
-
42
-
43
-
44
-
45
-
 46
46 -
 47
47 -
 48
48 -
 49
49 -
 50
50 -
 51
51 -
 52
52 -
 53
53 -
 54
54 -
 55
55 -
 56
56 -
57
-
58
-
59
-
60
-
61
-
62
-
63
-
64
-
65
-
66
-
67
-
68
-
69
-
70
-
71
-
72
-
73
-
74
-
75
-
76
-
77
-
78
-
79
 |
 |

3-9
Installing EPSON Stylus RIP for Windows
5.
At the Select the Printer Port dialog box, make sure the
Use the following port
option is selected, then choose
StylusRIP: EPSON StylusRIP
from the port list, and click
Next
.
6.
At the Add Printer Wizard dialog box, click
Have Disk
.
7.
At the Install from Disk dialog box, click
Browse
and
select
(CD-ROM drive):\PPD2000\USA\OEMSETUP.EXE
.
Then
click
Open
and click
OK
.
8.
At the Add Printer Wizard PPD List dialog box, highlight
the PPD file that corresponds to your printer model and
click
Next
.
Click here to
select your
printer