Epson 1520 User Manual - Epson Stylus RIP Mac & PC - Page 53
Setting Up Network Printing, Enabling File and Print Sharing
 |
UPC - 010343813328
View all Epson 1520 manuals
Add to My Manuals
Save this manual to your list of manuals |
Page 53 highlights
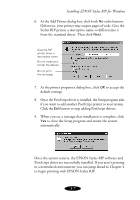
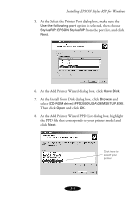
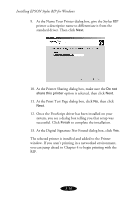
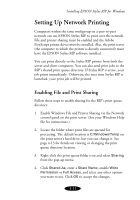
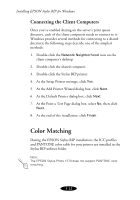
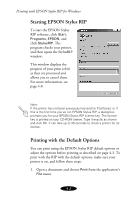
Installing EPSON Stylus RIP for Windows Setting Up Network Printing Computers within the same workgroup on a peer-to-peer network can use EPSON Stylus RIP to print over the network. File and printer sharing must be enabled and the Adobe PostScript printer driver must be installed. Also, the print server (the computer to which the printer is directly connected) must have the EPSON Stylus RIP software installed. You can print directly to the Stylus RIP printer from both the server and client computers. You can also send print jobs to the RIP's shared print queue directory. If Stylus RIP is active, your job prints immediately. Otherwise, the next time Stylus RIP is launched, your print job will be printed. Enabling File and Print Sharing Follow these steps to enable sharing for the RIP's print queue directory: 1. Enable Windows File and Printer Sharing via the Network control panel on the print server. (See your Windows Help file for instructions.) 2. Locate the folder where print files are queued for processing. The default location is C:\Windows\Temp on the print server's hard drive, but you can change it. See page 4-13 for details on viewing or changing the print queue directory location. 3. Right-click the print queue folder icon and select Sharing from the pop-up menu. 4. Click Shared As, enter a Share Name, enable Write Permission or Full Access, and select any other options you want to use. Click OK to accept the changes. 3-11
-
 1
1 -
2
-
3
-
4
-
5
-
6
-
7
-
8
-
9
-
10
-
11
-
12
-
13
-
14
-
15
-
16
-
17
-
18
-
19
-
20
-
21
-
22
-
23
-
24
-
25
-
26
-
27
-
28
-
29
-
30
-
31
-
32
-
33
-
34
-
35
-
36
-
37
-
38
-
39
-
40
-
41
-
42
-
43
-
44
-
45
-
46
-
47
-
 48
48 -
 49
49 -
 50
50 -
 51
51 -
 52
52 -
 53
53 -
 54
54 -
 55
55 -
 56
56 -
 57
57 -
 58
58 -
59
-
60
-
61
-
62
-
63
-
64
-
65
-
66
-
67
-
68
-
69
-
70
-
71
-
72
-
73
-
74
-
75
-
76
-
77
-
78
-
79
 |
 |
