Epson ActionNote 4SLC/25 User Manual - Page 53
right side with contacts first, then press on the left side to, secure the battery.
 |
View all Epson ActionNote 4SLC/25 manuals
Add to My Manuals
Save this manual to your list of manuals |
Page 53 highlights
4. Press down on the release buttons on the battery compartment cover and slide the cover toward you. 5. Pull up on the cloth tab and lift out the low battery. 6. Slide the fully-charged battery pack into the slot. Insert the right side (with contacts) first, then press on the left side to secure the battery. Powering the Computer 3-3
-
 1
1 -
2
-
3
-
4
-
5
-
6
-
7
-
8
-
9
-
10
-
11
-
12
-
13
-
14
-
15
-
16
-
17
-
18
-
19
-
20
-
21
-
22
-
23
-
24
-
25
-
26
-
27
-
28
-
29
-
30
-
31
-
32
-
33
-
34
-
35
-
36
-
37
-
38
-
39
-
40
-
41
-
42
-
43
-
44
-
45
-
46
-
47
-
 48
48 -
 49
49 -
 50
50 -
 51
51 -
 52
52 -
 53
53 -
 54
54 -
 55
55 -
 56
56 -
 57
57 -
 58
58 -
59
-
60
-
61
-
62
-
63
-
64
-
65
-
66
-
67
-
68
-
69
-
70
-
71
-
72
-
73
-
74
-
75
-
76
-
77
-
78
-
79
-
80
-
81
-
82
-
83
-
84
-
85
-
86
-
87
-
88
-
89
-
90
-
91
-
92
-
93
-
94
-
95
-
96
-
97
-
98
-
99
-
100
-
101
-
102
-
103
-
104
-
105
-
106
-
107
-
108
-
109
-
110
-
111
-
112
-
113
-
114
-
115
-
116
-
117
-
118
-
119
-
120
-
121
-
122
-
123
-
124
-
125
-
126
-
127
-
128
-
129
-
130
-
131
-
132
-
133
-
134
-
135
-
136
-
137
-
138
-
139
-
140
-
141
-
142
-
143
-
144
-
145
-
146
-
147
-
148
-
149
-
150
-
151
-
152
-
153
-
154
-
155
-
156
-
157
-
158
-
159
-
160
-
161
-
162
-
163
-
164
-
165
-
166
-
167
-
168
-
169
-
170
-
171
-
172
-
173
-
174
 |
 |

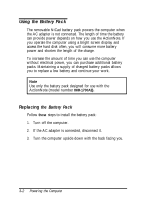
4.
Press down on the release buttons on the battery
compartment cover and slide the cover toward you.
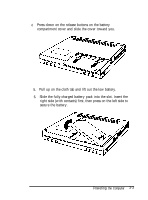
5.
Pull up on the cloth tab and lift out the low battery.
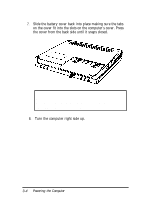
6.
Slide the fully-charged battery pack into the slot. Insert the
right side (with contacts) first, then press on the left side to
secure the battery.
Powering
the Computer
3-3