Epson ActionNote 4SLC/25 User Manual - Page 76
Replacing the Keyboard, Make sure the keyboard cables are not twisted.
 |
View all Epson ActionNote 4SLC/25 manuals
Add to My Manuals
Save this manual to your list of manuals |
Page 76 highlights
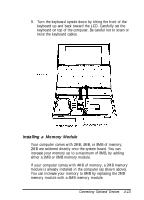
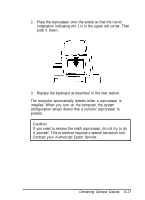
Replacing the Keyboard After installing a memory module or numeric coprocessor, you must replace the keyboard. Follow these steps: 1. Carefully lift the keyboard off the top of the computer, turn it right side up, and align it over the front of the computer. Make sure the keyboard cables are not twisted. 2. Carefully press the keyboard forward until the tabs on the keyboard fit into the slots on the computer's cover. 3. Press down on the front of the keyboard until it is securely in place. 4-18 Connecting Optional Devices
-
 1
1 -
2
-
3
-
4
-
5
-
6
-
7
-
8
-
9
-
10
-
11
-
12
-
13
-
14
-
15
-
16
-
17
-
18
-
19
-
20
-
21
-
22
-
23
-
24
-
25
-
26
-
27
-
28
-
29
-
30
-
31
-
32
-
33
-
34
-
35
-
36
-
37
-
38
-
39
-
40
-
41
-
42
-
43
-
44
-
45
-
46
-
47
-
48
-
49
-
50
-
51
-
52
-
53
-
54
-
55
-
56
-
57
-
58
-
59
-
60
-
61
-
62
-
63
-
64
-
65
-
66
-
67
-
68
-
69
-
70
-
 71
71 -
 72
72 -
 73
73 -
 74
74 -
 75
75 -
 76
76 -
 77
77 -
 78
78 -
 79
79 -
 80
80 -
 81
81 -
82
-
83
-
84
-
85
-
86
-
87
-
88
-
89
-
90
-
91
-
92
-
93
-
94
-
95
-
96
-
97
-
98
-
99
-
100
-
101
-
102
-
103
-
104
-
105
-
106
-
107
-
108
-
109
-
110
-
111
-
112
-
113
-
114
-
115
-
116
-
117
-
118
-
119
-
120
-
121
-
122
-
123
-
124
-
125
-
126
-
127
-
128
-
129
-
130
-
131
-
132
-
133
-
134
-
135
-
136
-
137
-
138
-
139
-
140
-
141
-
142
-
143
-
144
-
145
-
146
-
147
-
148
-
149
-
150
-
151
-
152
-
153
-
154
-
155
-
156
-
157
-
158
-
159
-
160
-
161
-
162
-
163
-
164
-
165
-
166
-
167
-
168
-
169
-
170
-
171
-
172
-
173
-
174
 |
 |

Replacing the Keyboard
After installing a memory module or numeric coprocessor, you
must replace the keyboard. Follow these steps:
1.
Carefully lift the keyboard off the top of the computer, turn
it right side up, and align it over the front of the computer.
Make sure the keyboard cables are not twisted.
2.
Carefully press the keyboard forward until the tabs on the
keyboard fit into the slots on the computer’s cover.
3.
Press down on the front of the keyboard until it is securely in
place.
4-18
Connecting Optional Devices