Epson Equity II User Manual - Page 26
DIP switch set 2, internal parallel, Switches 5 and, monitor
 |
View all Epson Equity II manuals
Add to My Manuals
Save this manual to your list of manuals |
Page 26 highlights
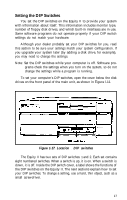
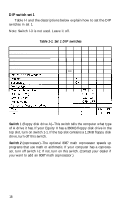
Switch 4 (internal parallel interface)-To use two or more parallel devices (usually printers), you need to designate the built-in parallel interface as either primary or secondary. In MS-DOS, you would then refer to it as LPT1 or LPT2 respectively. To use the built-in interface as the primary device, turn off switch l-4. If you have not installed extra parallel interfaces, the built-in interface is the primary device regardless of how you set this switch. You cannot disable the built-in parallel interface. If you have installed optional parallel interfaces, you can use the built-in port as the secondary device if you turn on switch l-4. You can then select any peripheral connected to an optional port as the primary device. Most option cards which contain parallel interfaces have jumper connectors which you must set to tell MS-DOS whether you are using the port as LPTl, LPT2, or LPT3. If you use the built-in interface as the primary device, you must set the jumper on the optional interface to make it LPT2 or LPT3. If you accidentally set both to act as the primary device, you will not damage the computer, but you will get unpredictable results from both interfaces. Switches 5 and 6 (monitor type)-Set switches l-5 and l-6 according to your monitor type as shown in Table l-l. Be sure to set these switches properly or you may damage your monitor. If you do not want to use the built-in video port (for example, if your monitor connects to an option card), turn on switches l-5 and l-6 to disable internal video. Switches 7 and 8 (number of floppy disk drives)-If your system has one floppy disk drive, turn on switches 1-7 and 1-8. If your system has two floppy disk drives, turn off switch 1-7 and turn on switch l-8. DIP switch set 2 Table l-2 and the descriptions below explain how to set the DIP switches in set 2. Note: Switches 2-l through 2-4 and switch 2-6 are not used. Leave them Off. 19
-
 1
1 -
2
-
3
-
4
-
5
-
6
-
7
-
8
-
9
-
10
-
11
-
12
-
13
-
14
-
15
-
16
-
17
-
18
-
19
-
20
-
 21
21 -
 22
22 -
 23
23 -
 24
24 -
 25
25 -
 26
26 -
 27
27 -
 28
28 -
 29
29 -
 30
30 -
 31
31 -
32
-
33
-
34
-
35
-
36
-
37
-
38
-
39
-
40
-
41
-
42
-
43
-
44
-
45
-
46
-
47
-
48
-
49
-
50
-
51
-
52
-
53
-
54
-
55
-
56
-
57
-
58
-
59
-
60
-
61
-
62
-
63
-
64
-
65
-
66
-
67
-
68
-
69
-
70
-
71
-
72
-
73
-
74
-
75
-
76
-
77
-
78
-
79
 |
 |
