Epson G7905UNL Users Guide - Page 161
Copying Menu Settings Between Projectors, Add New, Return, Enter, Setup complete, Schedule Reset
 |
View all Epson G7905UNL manuals
Add to My Manuals
Save this manual to your list of manuals |
Page 161 highlights
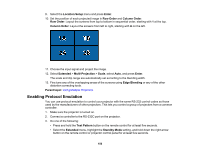
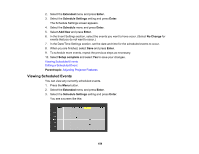
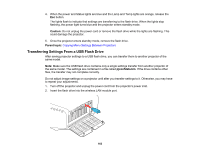
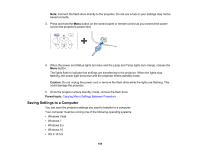
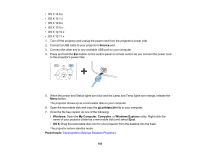
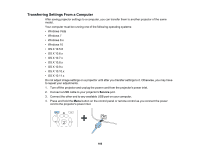
• Add New: Add a new scheduled event. 7. When you are finished, select Return and press Enter. 8. Select Setup complete and select Yes to save your changes. Note: To delete all scheduled events, select Schedule Reset and select Yes. Parent topic: Saving a Scheduled Event Copying Menu Settings Between Projectors After you select menu settings for your projector, you can transfer them to another projector of the same model. Note: Copy the projector's settings before you adjust the projected image using the projector's Geometric Correction settings. Any saved User's Logo setting on the projector will transfer to the other projector. Caution: If the copy process fails due to a power failure, communication error, or for any other reason, Epson will not be responsible for any repair costs incurred. The following settings will not transfer between projectors: • Info menu items • Network menu settings other than those in the Mail and Others menus Note: In addition to the methods covered this section, you can also copy and transfer settings to multiple projectors over a network using the EasyMP Network Updater software. See the EasyMP Network Updater Operation Guide for instructions. You can download the latest software and documentation from the Epson web site. Saving Settings to a USB Flash Drive Transferring Settings From a USB Flash Drive Saving Settings to a Computer Transferring Settings From a Computer Parent topic: Adjusting Projector Features 161
-
 1
1 -
2
-
3
-
4
-
5
-
6
-
7
-
8
-
9
-
10
-
11
-
12
-
13
-
14
-
15
-
16
-
17
-
18
-
19
-
20
-
21
-
22
-
23
-
24
-
25
-
26
-
27
-
28
-
29
-
30
-
31
-
32
-
33
-
34
-
35
-
36
-
37
-
38
-
39
-
40
-
41
-
42
-
43
-
44
-
45
-
46
-
47
-
48
-
49
-
50
-
51
-
52
-
53
-
54
-
55
-
56
-
57
-
58
-
59
-
60
-
61
-
62
-
63
-
64
-
65
-
66
-
67
-
68
-
69
-
70
-
71
-
72
-
73
-
74
-
75
-
76
-
77
-
78
-
79
-
80
-
81
-
82
-
83
-
84
-
85
-
86
-
87
-
88
-
89
-
90
-
91
-
92
-
93
-
94
-
95
-
96
-
97
-
98
-
99
-
100
-
101
-
102
-
103
-
104
-
105
-
106
-
107
-
108
-
109
-
110
-
111
-
112
-
113
-
114
-
115
-
116
-
117
-
118
-
119
-
120
-
121
-
122
-
123
-
124
-
125
-
126
-
127
-
128
-
129
-
130
-
131
-
132
-
133
-
134
-
135
-
136
-
137
-
138
-
139
-
140
-
141
-
142
-
143
-
144
-
145
-
146
-
147
-
148
-
149
-
150
-
151
-
152
-
153
-
154
-
155
-
 156
156 -
 157
157 -
 158
158 -
 159
159 -
 160
160 -
 161
161 -
 162
162 -
 163
163 -
 164
164 -
 165
165 -
 166
166 -
167
-
168
-
169
-
170
-
171
-
172
-
173
-
174
-
175
-
176
-
177
-
178
-
179
-
180
-
181
-
182
-
183
-
184
-
185
-
186
-
187
-
188
-
189
-
190
-
191
-
192
-
193
-
194
-
195
-
196
-
197
-
198
-
199
-
200
-
201
-
202
-
203
-
204
-
205
-
206
-
207
-
208
-
209
-
210
-
211
-
212
-
213
-
214
-
215
-
216
-
217
-
218
-
219
-
220
-
221
-
222
-
223
-
224
-
225
-
226
-
227
-
228
-
229
-
230
-
231
-
232
-
233
-
234
-
235
-
236
-
237
-
238
-
239
-
240
-
241
-
242
-
243
-
244
-
245
-
246
-
247
-
248
-
249
-
250
-
251
-
252
-
253
-
254
-
255
-
256
-
257
-
258
-
259
-
260
-
261
-
262
-
263
-
264
-
265
-
266
-
267
-
268
-
269
-
270
-
271
-
272
-
273
-
274
-
275
-
276
-
277
-
278
-
279
-
280
-
281
-
282
-
283
-
284
-
285
-
286
-
287
-
288
-
289
-
290
-
291
-
292
-
293
-
294
-
295
-
296
-
297
-
298
-
299
 |
 |
