Epson LX-300II User's Guide - Page 20
Printing with the pull tractor, and pulling it out of the printer.
 |
View all Epson LX-300II manuals
Add to My Manuals
Save this manual to your list of manuals |
Page 20 highlights
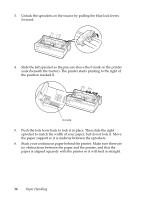
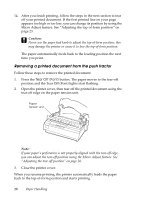
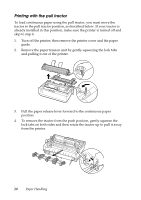
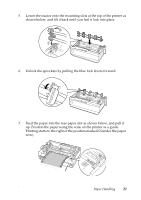
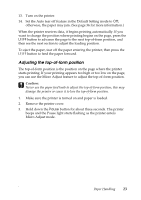
Printing with the pull tractor To load continuous paper using the pull tractor, you must move the tractor to the pull tractor position, as described below. If your tractor is already installed in this position, make sure the printer is turned off and skip to step 6. 1. Turn off the printer; then remove the printer cover and the paper guide. 2. Remove the paper tension unit by gently squeezing the lock tabs and pulling it out of the printer. 3. Pull the paper release lever forward to the continuous paper position. 4. To remove the tractor from the push position, gently squeeze the lock tabs on both sides and then rotate the tractor up to pull it away from the printer. 20 Paper Handling
-
 1
1 -
2
-
3
-
4
-
5
-
6
-
7
-
8
-
9
-
10
-
11
-
12
-
13
-
14
-
 15
15 -
 16
16 -
 17
17 -
 18
18 -
 19
19 -
 20
20 -
 21
21 -
 22
22 -
 23
23 -
 24
24 -
 25
25 -
26
-
27
-
28
-
29
-
30
-
31
-
32
-
33
-
34
-
35
-
36
-
37
-
38
-
39
-
40
-
41
-
42
-
43
-
44
-
45
-
46
-
47
-
48
-
49
-
50
 |
 |

20
Paper Handling
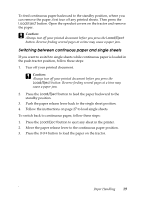
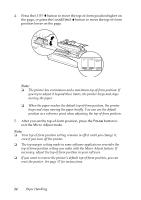
Printing with the pull tractor
To load continuous paper using the pull tractor, you must move the
tractor to the pull tractor position, as described below. If your tractor is
already installed in this position, make sure the printer is turned off and
skip to step 6.
1.
Turn off the printer; then remove the printer cover and the paper
guide.
2.
Remove the paper tension unit by gently squeezing the lock tabs
and pulling it out of the printer.
3.
Pull the paper release lever forward to the continuous paper
position.
4.
To remove the tractor from the push position, gently squeeze the
lock tabs on both sides and then rotate the tractor up to pull it away
from the printer.