Epson LX-300II User's Guide - Page 31
Labels, Envelopes - test print
 |
View all Epson LX-300II manuals
Add to My Manuals
Save this manual to your list of manuals |
Page 31 highlights
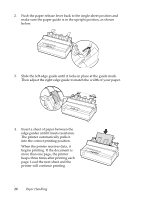
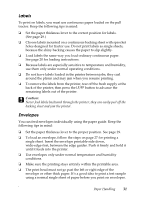
Labels To print on labels, you must use continuous paper loaded on the pull tractor. Keep the following tips in mind: ❏ Set the paper thickness lever to the correct position for labels. (See page 29.) ❏ Choose labels mounted on a continuous backing sheet with sprocket holes designed for tractor use. Do not print labels as single sheets, because the shiny backing causes the paper to slip slightly. ❏ Load labels the same way you load ordinary continuous paper. See page 20 for loading instructions. ❏ Because labels are especially sensitive to temperature and humidity, use them only under normal operating conditions. ❏ Do not leave labels loaded in the printer between jobs; they curl around the platen and may jam when you resume printing. ❏ To remove the labels from the printer, tear off the fresh supply at the back of the printer; then press the LF/FF button to advance the remaining labels out of the printer. c Caution: Never feed labels backward through the printer; they can easily peel off the backing sheet and jam the printer. Envelopes You can feed envelopes individually using the paper guide. Keep the following tips in mind: ❏ Set the paper thickness lever to the proper position. See page 29. ❏ To load an envelope, follow the steps on page 27 for printing a single sheet. Insert the envelope printable-side down, wide-edge-first, between the edge guides. Push it firmly and hold it until it feeds into the printer. ❏ Use envelopes only under normal temperature and humidity conditions. ❏ Make sure the printing stays entirely within the printable area. ❏ The print head must not go past the left or right edge of the envelope or other thick paper. It's a good idea to print a test sample using a normal single sheet of paper before you print on envelopes. Paper Handling 31
-
 1
1 -
2
-
3
-
4
-
5
-
6
-
7
-
8
-
9
-
10
-
11
-
12
-
13
-
14
-
15
-
16
-
17
-
18
-
19
-
20
-
21
-
22
-
23
-
24
-
25
-
 26
26 -
 27
27 -
 28
28 -
 29
29 -
 30
30 -
 31
31 -
 32
32 -
 33
33 -
 34
34 -
 35
35 -
 36
36 -
37
-
38
-
39
-
40
-
41
-
42
-
43
-
44
-
45
-
46
-
47
-
48
-
49
-
50
 |
 |