Epson PP-50BD Users Guide - Page 87
Getting Maintenance Information, Transporting Your Product, Start, All Programs
 |
View all Epson PP-50BD manuals
Add to My Manuals
Save this manual to your list of manuals |
Page 87 highlights
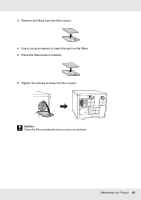
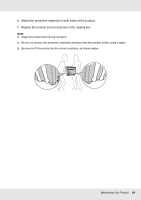
Getting Maintenance Information You can get helpful information for maintenance and support of the product, such as the cumulative number of printed discs and the service life of the drive. 1. Make sure that the product is connected to the computer via the USB cable and that the product is turned on. 2. Click Start ( ), point to All Programs, click EPSON Total Disc Maker, and then click EPSON Total Disc Setup. 3. Select CD/DVD/BD Publisher, and then click Properties. 4. Click the Maintenance Info tab. Note: When Service life of Drive is close to 100%, it is time to replace it. Transporting Your Product If you need to transport your product some distance, carefully prepare and repack it. Be sure to use the original box and packing materials. w Warning: The product is heavy, so have two people lift the product. c Caution: ❏ When storing or transporting the product, do not tilt it, stand it up vertically, or turn it upside down. If you need to transport the product, carefully prepare and repack it using the original box and packing materials in order to protect the product from shock. ❏ Leave the ink cartridges installed. Removing the cartridges can dry out the print head and may prevent the product from printing. 1. Turn off the product and unplug its power cord. 2. Disconnect the interface cable. 3. Remove all discs from the stackers. 4. Open the ink cartridge cover. Secure the ink cartridges with tape; then close the ink cartridge cover. 5. Close the disc cover. Secure it with tape. Maintaining Your Product 87
-
 1
1 -
2
-
3
-
4
-
5
-
6
-
7
-
8
-
9
-
10
-
11
-
12
-
13
-
14
-
15
-
16
-
17
-
18
-
19
-
20
-
21
-
22
-
23
-
24
-
25
-
26
-
27
-
28
-
29
-
30
-
31
-
32
-
33
-
34
-
35
-
36
-
37
-
38
-
39
-
40
-
41
-
42
-
43
-
44
-
45
-
46
-
47
-
48
-
49
-
50
-
51
-
52
-
53
-
54
-
55
-
56
-
57
-
58
-
59
-
60
-
61
-
62
-
63
-
64
-
65
-
66
-
67
-
68
-
69
-
70
-
71
-
72
-
73
-
74
-
75
-
76
-
77
-
78
-
79
-
80
-
81
-
 82
82 -
 83
83 -
 84
84 -
 85
85 -
 86
86 -
 87
87 -
 88
88 -
 89
89 -
 90
90 -
 91
91 -
 92
92 -
93
-
94
-
95
-
96
-
97
-
98
-
99
-
100
-
101
-
102
-
103
-
104
-
105
-
106
-
107
-
108
-
109
-
110
-
111
-
112
-
113
-
114
-
115
-
116
-
117
-
118
-
119
-
120
-
121
-
122
-
123
-
124
 |
 |