Epson PowerLite Home Cinema 750HD User Manual - Page 30
Connecting to a Video Source for Sound
 |
View all Epson PowerLite Home Cinema 750HD manuals
Add to My Manuals
Save this manual to your list of manuals |
Page 30 highlights
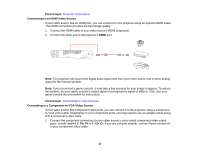
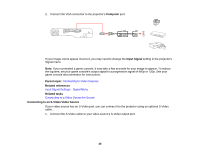
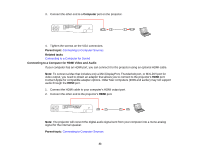
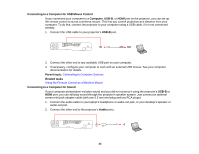
Note: If you connected a game console, it may take a few seconds for your image to appear. To reduce the lag time, set your game console's output signal to a progressive signal of 480p or 720p. See your game console documentation for instructions. Parent topic: Connecting to Video Sources Related tasks Connecting to a Video Source for Sound Connecting to a Video Source for Sound You can play sound through the projector's speaker system if your video source has audio output ports. Connect the projector to the video source using an RCA audio cable. Note: If you connected your video source to the projector using an HDMI cable, the audio signal is transferred with the video signal; you do not need an additional cable for sound. 1. Connect the audio cable to your video source's audio-out ports. 2. Connect the other end of the cable to the projector's Audio port or ports. Note: To add additional sound, connect your video source and speakers to an audio video receiver, then connect the receiver to the projector using one of the receiver's compatible video outputs (an HDMI connection provides the best image quality, if available). You can also connect speakers to any video source that has its own speaker connections. Parent topic: Connecting to Video Sources 30
-
 1
1 -
2
-
3
-
4
-
5
-
6
-
7
-
8
-
9
-
10
-
11
-
12
-
13
-
14
-
15
-
16
-
17
-
18
-
19
-
20
-
21
-
22
-
23
-
24
-
 25
25 -
 26
26 -
 27
27 -
 28
28 -
 29
29 -
 30
30 -
 31
31 -
 32
32 -
 33
33 -
 34
34 -
 35
35 -
36
-
37
-
38
-
39
-
40
-
41
-
42
-
43
-
44
-
45
-
46
-
47
-
48
-
49
-
50
-
51
-
52
-
53
-
54
-
55
-
56
-
57
-
58
-
59
-
60
-
61
-
62
-
63
-
64
-
65
-
66
-
67
-
68
-
69
-
70
-
71
-
72
-
73
-
74
-
75
-
76
-
77
-
78
-
79
-
80
-
81
-
82
-
83
-
84
-
85
-
86
-
87
-
88
-
89
-
90
-
91
-
92
-
93
-
94
-
95
-
96
-
97
-
98
-
99
-
100
-
101
-
102
-
103
-
104
-
105
-
106
-
107
-
108
-
109
-
110
-
111
-
112
-
113
-
114
-
115
-
116
-
117
-
118
-
119
-
120
-
121
-
122
-
123
-
124
-
125
-
126
-
127
-
128
-
129
-
130
-
131
-
132
-
133
-
134
-
135
-
136
-
137
-
138
-
139
-
140
-
141
-
142
-
143
-
144
-
145
-
146
-
147
-
148
-
149
-
150
-
151
-
152
-
153
-
154
-
155
-
156
-
157
-
158
-
159
-
160
-
161
-
162
-
163
-
164
-
165
-
166
-
167
-
168
-
169
-
170
-
171
-
172
-
173
-
174
-
175
-
176
-
177
-
178
-
179
-
180
-
181
 |
 |
