Epson Stylus COLOR 1160 Printer Basics - Page 45
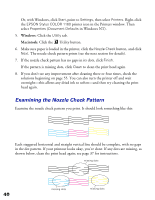
Examining the Nozzle Check Pattern
 |
View all Epson Stylus COLOR 1160 manuals
Add to My Manuals
Save this manual to your list of manuals |
Page 45 highlights
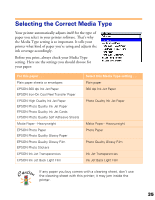
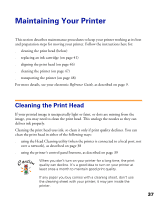
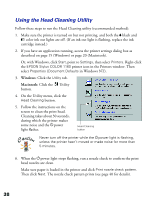
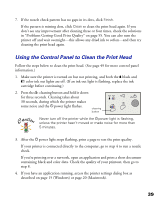
Or, with Windows, click Start, point to Settings, then select Printers. Right-click the EPSON Stylus COLOR 1160 printer icon in the Printers window. Then select Properties (Document Defaults in Windows NT). 5. Windows: Click the Utility tab. Macintosh: Click the Utility button. 6. Make sure paper is loaded in the printer, click the Nozzle Check button, and click Next. The nozzle check pattern prints (see the next section for details). 7. If the nozzle check pattern has no gaps in its dots, click Finish. If the pattern is missing dots, click Clean to clean the print head again. 8. If you don't see any improvement after cleaning three or four times, check the solutions beginning on page 55. You can also turn the printer off and wait overnight-this allows any dried ink to soften-and then try cleaning the print head again. Examining the Nozzle Check Pattern Examine the nozzle check pattern you print. It should look something like this: Each staggered horizontal and straight vertical line should be complete, with no gaps in the dot pattern. If your printout looks okay, you're done. If any dots are missing, as shown below, clean the print head again; see page 37 for instructions. missing dots 40 missing dots missing dots
-
 1
1 -
2
-
3
-
4
-
5
-
6
-
7
-
8
-
9
-
10
-
11
-
12
-
13
-
14
-
15
-
16
-
17
-
18
-
19
-
20
-
21
-
22
-
23
-
24
-
25
-
26
-
27
-
28
-
29
-
30
-
31
-
32
-
33
-
34
-
35
-
36
-
37
-
38
-
39
-
 40
40 -
 41
41 -
 42
42 -
 43
43 -
 44
44 -
 45
45 -
 46
46 -
 47
47 -
 48
48 -
 49
49 -
 50
50 -
51
-
52
-
53
-
54
-
55
-
56
-
57
-
58
-
59
-
60
-
61
-
62
-
63
-
64
-
65
-
66
-
67
-
68
-
69
-
70
-
71
-
72
-
73
 |
 |