Epson Stylus COLOR 1160 Printer Basics - Page 62
You see wrong or missing colors., You see incorrect characters., Your printout is grainy.
 |
View all Epson Stylus COLOR 1160 manuals
Add to My Manuals
Save this manual to your list of manuals |
Page 62 highlights
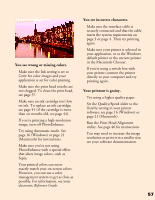
You see wrong or missing colors. s Make sure the Ink setting is set to Color for color images and your application is set for color printing. s Make sure the print head nozzles are not clogged. To clean the print head, see page 37. s Make sure an ink cartridge isn't low on ink. To replace an ink cartridge; see page 41 (if the cartridge is more than six months old, see page 44). s If you're printing a high-resolution image, turn off PhotoEnhance. s Try using Automatic mode. See page 16 (Windows) or page 21 (Macintosh) for instructions. s Make sure you're not using PhotoEnhance with a special effect that alters image colors, such as Sepia. s Your printed colors can never exactly match your on-screen colors. However, you can use a color management system to get as close as possible. For information, see your electronic Reference Guide. You see incorrect characters. s Make sure the interface cable is securely connected and that the cable meets the system requirements on page 3 or page 4. Then try printing again. s Make sure your printer is selected in your application, or as the Windows default printer or the current printer in the Macintosh Chooser. s If you're using a switch box with your printer; connect the printer directly to your computer and try printing again. Your printout is grainy. s Try using a higher quality paper. s Set the Quality/Speed slider to the Quality setting in your printer software; see page 16 (Windows) or page 21 (Macintosh). s Run the Print Head Alignment utility. See page 46 for instructions. s You may need to increase the image resolution or print it in a smaller size; see your software documentation. 57
-
 1
1 -
2
-
3
-
4
-
5
-
6
-
7
-
8
-
9
-
10
-
11
-
12
-
13
-
14
-
15
-
16
-
17
-
18
-
19
-
20
-
21
-
22
-
23
-
24
-
25
-
26
-
27
-
28
-
29
-
30
-
31
-
32
-
33
-
34
-
35
-
36
-
37
-
38
-
39
-
40
-
41
-
42
-
43
-
44
-
45
-
46
-
47
-
48
-
49
-
50
-
51
-
52
-
53
-
54
-
55
-
56
-
 57
57 -
 58
58 -
 59
59 -
 60
60 -
 61
61 -
 62
62 -
 63
63 -
 64
64 -
 65
65 -
 66
66 -
 67
67 -
68
-
69
-
70
-
71
-
72
-
73
 |
 |