Epson Stylus Pro 7900 Proofing Edition Setup Guide ( Epson SpectroProofer &tra - Page 12
the printer, and then release the plate so it rests flush against the printer.
 |
View all Epson Stylus Pro 7900 Proofing Edition manuals
Add to My Manuals
Save this manual to your list of manuals |
Page 12 highlights
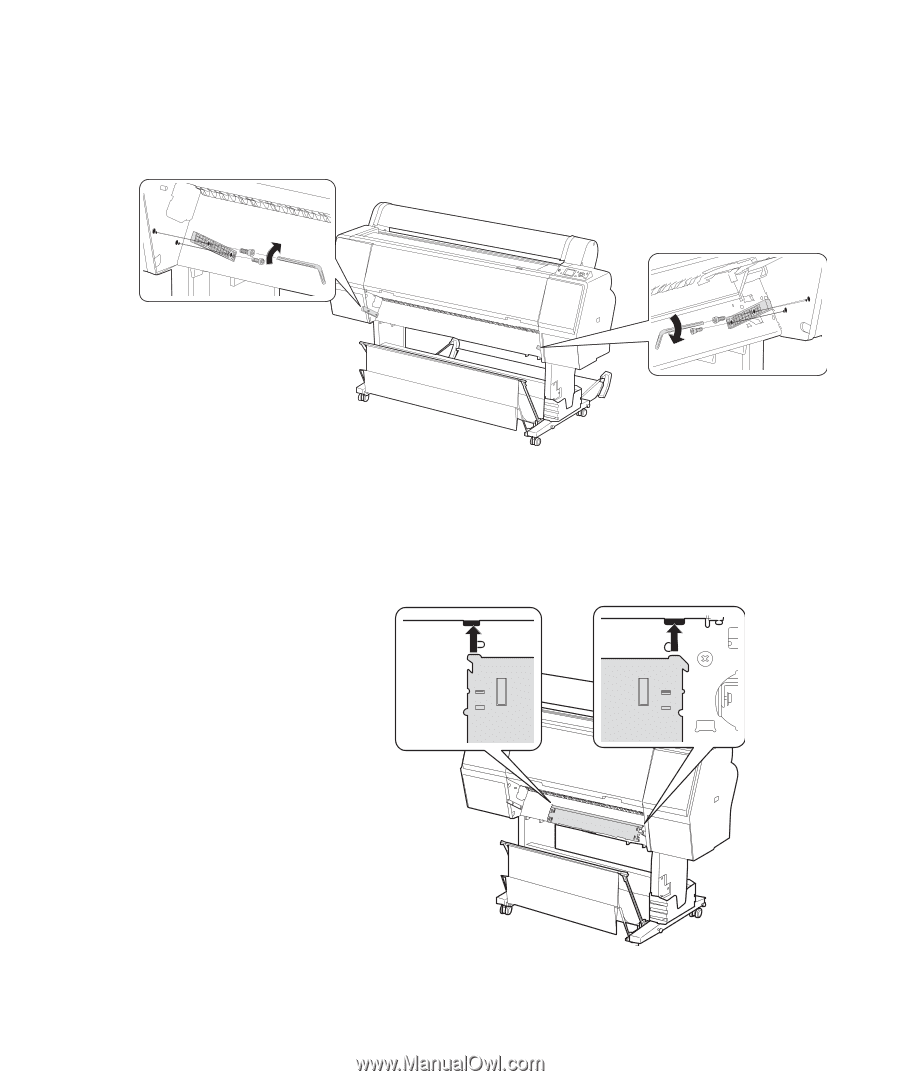
12 | Setting Up the SpectroProofer 3. Using the included bolts and Allen wrench, install the mounting rails in the two locations shown below. Note: The backing plates provide a uniformly opaque surface under the paper. The white backing plate should normally be used. Use the black backing plate if your paper has a watermark on the reverse side. 4. Select whether you want to use the white or black backing plate(s). To attach a plate, align the tabs at the top of the plate with the slots on the printer, and then release the plate so it rests flush against the printer. The backing plate adheres magnetically; it is attached correctly if it doesn't move when you try to slide it. 12
-
 1
1 -
2
-
3
-
4
-
5
-
6
-
 7
7 -
 8
8 -
 9
9 -
 10
10 -
 11
11 -
 12
12 -
 13
13 -
 14
14 -
 15
15 -
 16
16 -
 17
17 -
18
-
19
-
20
-
21
-
22
-
23
-
24
-
25
-
26
-
27
-
28
-
29
-
30
-
31
-
32
-
33
-
34
-
35
-
36
 |
 |
12
12
|
Setting Up the SpectroProofer
3.
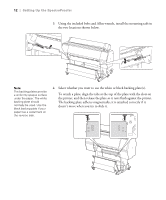
Using the included bolts and Allen wrench, install the mounting rails in
the two locations shown below.
4.
Select whether you want to use the white or black backing plate(s).
To attach a plate, align the tabs at the top of the plate with the slots on
the printer, and then release the plate so it rests flush against the printer.
The backing plate adheres magnetically; it is attached correctly if it
doesn’t move when you try to slide it.
Note:
The backing plates provide
a uniformly opaque surface
under the paper. The white
backing plate should
normally be used. Use the
black backing plate if your
paper has a watermark on
the reverse side.