Epson WorkForce WF-100 User Manual - Page 24
Setting Up Google Cloud Print on a Chromebook, Google Cloud Print Services - setup
 |
View all Epson WorkForce WF-100 manuals
Add to My Manuals
Save this manual to your list of manuals |
Page 24 highlights
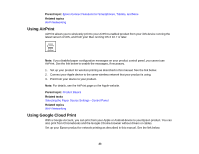
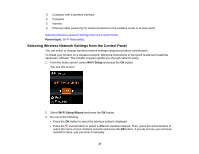
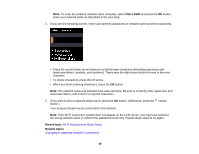
Note: Make sure your Epson printer and computer are connected to the same network before starting the Google Cloud Print setup. 1. Connect your device to the same network that your Epson product is using. 2. Print a network status sheet. 3. Locate your product's IP address on the network status sheet. 4. Enter the IP address into the address bar of a web browser. 5. Select the Google Cloud Print Services option. Note: If you don't see the Google Cloud Print Services option, turn your product off and back on. If the option still doesn't appear, select the Firmware Update option and follow the on-screen instructions to update your product. 6. Click Register. 7. Select the checkbox to agree to the Usage Advisory and click Next. 8. Click OK to launch the sign-in page. A separate browser window opens. 9. Enter your Google Account username and password and click Sign in, or, if you don't have an account, click Sign up for a new Google Account and follow the on-screen instructions. 10. Click Finish printer registration to complete setup and print a test page. Your product is now linked to your Google Account and can be accessed from any Chromebook, computer, Apple or Android device with Internet access. Visit Epson Support for more information on using Google Cloud Print, or the Google Cloud Print website for a list of supported apps. Setting Up Google Cloud Print on a Chromebook Parent topic: Product Basics Related tasks Printing a Network Status Sheet Related topics Wi-Fi Networking Setting Up Google Cloud Print on a Chromebook With a Google Account, you can print from a Chromebook without drivers or cables. 24
-
 1
1 -
2
-
3
-
4
-
5
-
6
-
7
-
8
-
9
-
10
-
11
-
12
-
13
-
14
-
15
-
16
-
17
-
18
-
 19
19 -
 20
20 -
 21
21 -
 22
22 -
 23
23 -
 24
24 -
 25
25 -
 26
26 -
 27
27 -
 28
28 -
 29
29 -
30
-
31
-
32
-
33
-
34
-
35
-
36
-
37
-
38
-
39
-
40
-
41
-
42
-
43
-
44
-
45
-
46
-
47
-
48
-
49
-
50
-
51
-
52
-
53
-
54
-
55
-
56
-
57
-
58
-
59
-
60
-
61
-
62
-
63
-
64
-
65
-
66
-
67
-
68
-
69
-
70
-
71
-
72
-
73
-
74
-
75
-
76
-
77
-
78
-
79
-
80
-
81
-
82
-
83
-
84
-
85
-
86
-
87
-
88
-
89
-
90
-
91
-
92
-
93
-
94
-
95
-
96
-
97
-
98
-
99
-
100
-
101
-
102
-
103
-
104
-
105
-
106
-
107
-
108
-
109
-
110
-
111
-
112
-
113
-
114
-
115
-
116
-
117
-
118
-
119
-
120
-
121
-
122
-
123
-
124
-
125
-
126
-
127
-
128
-
129
-
130
-
131
-
132
-
133
-
134
-
135
-
136
-
137
-
138
-
139
-
140
-
141
-
142
-
143
-
144
-
145
-
146
-
147
-
148
-
149
-
150
-
151
-
152
-
153
-
154
-
155
-
156
-
157
-
158
-
159
-
160
-
161
-
162
-
163
-
164
 |
 |
