Epson XP-8500 Users Guide - Page 159
Transferring Photos on a Memory Card, Various prints, Greeting Card, Print Using the Template, Copies
 |
View all Epson XP-8500 manuals
Add to My Manuals
Save this manual to your list of manuals |
Page 159 highlights
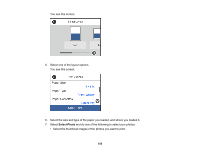
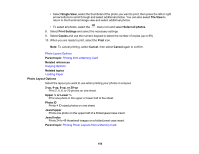
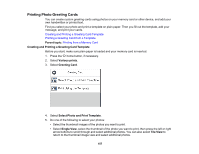
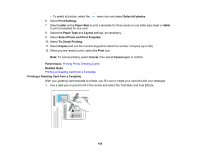
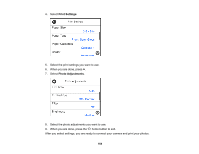
2. Add your greeting card message within the box. You can write it in by hand, print a message and paste it into the box, or draw a picture. Note: When adding text, place it in the direction that your photo faces. 3. Load photo paper either in Cassette 2 (lower) for this size: Letter (8.5 × 11 inches [216 × 279 mm]), or in Cassette 1 (upper) for this size: 4 × 6 inches (102 × 152 mm). 4. Press the home button and select Various prints > Greeting Card > Print Using the Template. 5. Follow the instructions on the LCD screen to place the template facedown on the scanner glass with the blue triangle facing into the front right corner. 6. Close the document cover. 7. Select Copies and use the numeric keypad to select the number of copies (up to 99). 8. When you are ready to print, select the Print icon. Note: To cancel printing, select Cancel, then select Cancel again to confirm. When you finish printing, cut your greeting cards apart, if necessary. Parent topic: Printing Photo Greeting Cards Related tasks Creating and Printing a Greeting Card Template Removing a Memory Card Transferring Photos on a Memory Card You can transfer photos to and from a memory card inserted into a memory card slot on your product. Setting Up File Sharing for Photo Transfers from Your Computer Transferring Photos from a Memory Card to Your Computer Parent topic: Using Memory Cards with Your Product Related tasks Inserting a Memory Card Removing a Memory Card 159
-
 1
1 -
2
-
3
-
4
-
5
-
6
-
7
-
8
-
9
-
10
-
11
-
12
-
13
-
14
-
15
-
16
-
17
-
18
-
19
-
20
-
21
-
22
-
23
-
24
-
25
-
26
-
27
-
28
-
29
-
30
-
31
-
32
-
33
-
34
-
35
-
36
-
37
-
38
-
39
-
40
-
41
-
42
-
43
-
44
-
45
-
46
-
47
-
48
-
49
-
50
-
51
-
52
-
53
-
54
-
55
-
56
-
57
-
58
-
59
-
60
-
61
-
62
-
63
-
64
-
65
-
66
-
67
-
68
-
69
-
70
-
71
-
72
-
73
-
74
-
75
-
76
-
77
-
78
-
79
-
80
-
81
-
82
-
83
-
84
-
85
-
86
-
87
-
88
-
89
-
90
-
91
-
92
-
93
-
94
-
95
-
96
-
97
-
98
-
99
-
100
-
101
-
102
-
103
-
104
-
105
-
106
-
107
-
108
-
109
-
110
-
111
-
112
-
113
-
114
-
115
-
116
-
117
-
118
-
119
-
120
-
121
-
122
-
123
-
124
-
125
-
126
-
127
-
128
-
129
-
130
-
131
-
132
-
133
-
134
-
135
-
136
-
137
-
138
-
139
-
140
-
141
-
142
-
143
-
144
-
145
-
146
-
147
-
148
-
149
-
150
-
151
-
152
-
153
-
 154
154 -
 155
155 -
 156
156 -
 157
157 -
 158
158 -
 159
159 -
 160
160 -
 161
161 -
 162
162 -
 163
163 -
 164
164 -
165
-
166
-
167
-
168
-
169
-
170
-
171
-
172
-
173
-
174
-
175
-
176
-
177
-
178
-
179
-
180
-
181
-
182
-
183
-
184
-
185
-
186
-
187
-
188
-
189
-
190
-
191
-
192
-
193
-
194
-
195
-
196
-
197
-
198
-
199
-
200
-
201
-
202
-
203
-
204
-
205
-
206
-
207
-
208
-
209
-
210
-
211
-
212
-
213
-
214
-
215
-
216
-
217
-
218
-
219
-
220
-
221
-
222
-
223
-
224
-
225
-
226
-
227
-
228
-
229
-
230
-
231
-
232
-
233
-
234
-
235
-
236
-
237
-
238
-
239
-
240
-
241
-
242
-
243
-
244
-
245
-
246
-
247
-
248
-
249
-
250
-
251
-
252
-
253
-
254
-
255
-
256
-
257
-
258
-
259
-
260
-
261
-
262
-
263
-
264
-
265
-
266
-
267
-
268
-
269
-
270
-
271
-
272
-
273
-
274
-
275
-
276
-
277
-
278
-
279
-
280
-
281
-
282
-
283
-
284
-
285
-
286
-
287
-
288
-
289
-
290
-
291
-
292
-
293
-
294
-
295
-
296
 |
 |