Fluke TIS20-9Hz User Manual - Page 21
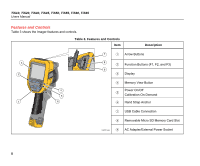
Control Buttons, Memory, Controls and Adjustments
 |
View all Fluke TIS20-9Hz manuals
Add to My Manuals
Save this manual to your list of manuals |
Page 21 highlights
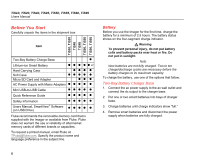
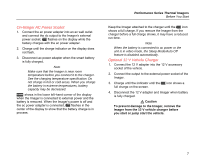
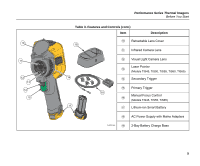
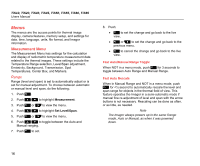
Control Buttons The function and cursor buttons are the primary controls. These buttons move the cursor through the menu structure to set the features. Controls and Adjustments • User-selectable temperature scale • Language/localization selection • Time and date settings • Emissivity selection • Reflected background temperature compensation • Transmission correction • User-selectable hot spot and cold spot, and center point on the image • Expand/contract measurement box with MIN-AVG-MAX • Color alarms • User-selectable backlight setting • Graphic information display (selectable) Performance Series Thermal Imagers Before You Start In general, push: 1 to set the change and go back to the live view. to set the change and go back to the previous menu. to cancel the change and go back to the live view. ZYXW to move the cursor and highlight an option. In live Manual Mode, the arrow buttons are always active to adjust Level and Span. Memory Push to go directly to the preview images of stored files. See page 29 for more information about the Memory feature. Warning To prevent eye damage and personal injury, do not look into the laser. Do not point the laser directly at persons or animals or indirectly off reflective surfaces. The laser warning symbol () shows in the Header zone of the display when the laser is turned on and you pull the secondary trigger. 11
-
 1
1 -
2
-
3
-
4
-
5
-
6
-
7
-
8
-
9
-
10
-
11
-
12
-
13
-
14
-
15
-
 16
16 -
 17
17 -
 18
18 -
 19
19 -
 20
20 -
 21
21 -
 22
22 -
 23
23 -
 24
24 -
 25
25 -
 26
26 -
27
-
28
-
29
-
30
-
31
-
32
-
33
-
34
-
35
-
36
-
37
-
38
-
39
-
40
-
41
-
42
-
43
-
44
-
45
-
46
-
47
-
48
-
49
-
50
-
51
-
52
 |
 |