Harman Kardon AVR 240 Owners Manual - Page 44
Programming The Remote - 7 1 home theater receiver
 |
View all Harman Kardon AVR 240 manuals
Add to My Manuals
Save this manual to your list of manuals |
Page 44 highlights
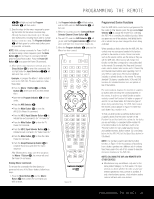
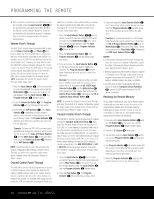
PROGRAMMING THE REMOTE The AVR 240 is equipped with a powerful remote control that will control not only the receiver's functions, but also most popular brands of audio and video equipment, including CD players, cassette decks, TV sets, cable boxes, VCRs, satellite receivers and other home theater equipment. Once the AVR 240's remote is programmed with the codes for the products you own, it is possible to eliminate most other remotes and replace them with the convenience of a single, universal remote control. Programming Device Codes The AVR 240 remote is factory-programmed for all AVR functions, as well as those of most Harman Kardon CD changers, DVD players, CD players and cassette decks, as well as the navigation controls for the iPod. In addition, by following one of the methods below, you may program the remote to operate a wide range of devices from other manufacturers. Direct Code Entry This method is the easiest way to program your remote to work with different products. 1. Use the tables in the following pages to determine the three-digit code or codes that match both the product type (e.g., VCR, TV) and the specific brand name. If there is more than one number for a brand, make note of the different choices. 2. Turn on the unit you wish to program into the AVR 240 remote. 3. Press and hold both the Input Selector e for the p4ro9duct4y7ou w4i5 sh to4c3ontrol (e.g., VCR, TV) and 4 th8e Mu4t6e Bu4tt4on 42 at the same time. When the red light under the Input Selector e 35 stays lit 37 and the 39 41 Program Indicator c turns ambe3r4and3b6egin3 s 8flash4 in0 g, relea3s7 e the4b1utto4n7 s. It 51 is im3po3rtant2t6 hat y2o5u be3g7 in the n3e6xt ste4p0with4in6 50 20 s3ec2onds2. 7 24 36 35 39 45 49 4. Point3th1e AV2R82402'3 s rem3o5te towa3rd4 the3u8nit to44be 48 prog3 ra0 mme2 d,9and2e2nter3th4e first t3h3 ree-digit co4d3e using2t9he N3 um0eri2c1Key3 s3r. I3 f t2he unit turn4s2off, the c2o8 rrect 3 co1de h2a0s be3en2entere3d1. Press the Input Selector e again, and note that the red light will flash three times before going dark to confirm the entry. 5. If the device to be programmed in does NOT turn off, continue to enter three-digit codes until the equipment turns off. At this point, the correct code has been entered. Press the Input Selector e again and note that the red light under the Input Selector e will flash three times before going dark to confirm the entry. 6. Try all of the functions on the remote to make certain that the product operates properly. Keep in mind that many manufacturers use a number of different combinations of codes, so it is a good idea to make certain that not only the power control, but the volume, channel and transport controls work as they should. If functions do not work properly, you may need to use a different remote code. 7. If a code cannot be entered to turn the unit off, if the code for your product does not appear in the tables in this manual, or if not all functions operate properly, try programming the remote with the Auto Search Method. NOTE: If you are using your iPod with a TEN Technology product, you may use the direct-code entry procedure to program remote control codes for the TEN Technology product. Select the DMP Input Selector 4 in Steps 3 through 5, and enter product code 002 in Step 4. Auto Search Method If the unit you wish to include in the AVR 240's remote is not listed in the code tables in this manual or if the code does not seem to operate properly, you may wish to program the correct code using the Auto Search method that follows: 1. Turn on the unit that you wish to include in the AVR 240 remote. 2. Press the Input Selector e for the type of product to be entered (e.g., VCR, TV) and the Mute Button f at the same time. Hold both buttons until the red light under the Input Selector e stays lit and the Program Indicator c turns amber and begins flashing. The next step must take place while the red light is on, and it must begin within 20 seconds after the light appears. 3. Point the AVR 240 remote toward the unit to be programmed, and press either the ⁄ or ¤ Button n repeatedly. Each press will send out a series of codes from the remote's built-in database. When the unit being programmed turns off, stop pressing the ⁄/¤ Buttons n, as that is your indication that the correct code is in use. 4. Press the Input Selector e; the red light under the Input Selector will flash three times before going dark to confirm the entry. 5. Try all of the functions on the remote to make certain that the product operates. Keep in mind that many manufacturers use a number of different combinations of codes, and it is a good idea to make certain that not only the power control works, but also the volume, channel and transport controls, as appropriate. If all functions do not work properly, you may need to Auto-Search for a different code, or enter a code via the Direct Code Entry method. Code Readout When the code has been entered using the Auto Search method, it is always a good idea to find out the exact code so that it may be easily reentered if necessary. You may also read the codes to verify which device has been programmed to a specific Control Selector button. 1. Press and hold both the Input Selector e for the device you wish to find the code for and the Mute Button f at the same time. The Program Indicator c will turn amber and begin flashing, and the red light under the Input Selector e will stay lit. Release the buttons and begin the next step within 20 seconds. 2. Press the Set Button p. The Program Indicator c will then blink green in a sequence that corresponds to the three-digit code, with a onesecond pause between each digit. Count the number of blinks between pauses to determine the digit of the code. One blink is the number 1, two blinks is the number 2, and so forth. Ten blinks are used to indicate a "0." Example: One blink, followed by a one-second pause, followed by six blinks, followed by a one-second pause, followed by ten blinks indicates that the code has been set to 160. For future reference, enter the setup codes for the equipment in your system here: DVD CD VID1/VCR __________ VID2/CBL __________ VID2/SAT ________ VID3/TV __________ VID4 TAPE Macro Programming Macros enable you to easily repeat frequently used combinations of commands with the press of a single button on the AVR 240's remote control. Once programmed, a macro will send out up to 19 different remote codes in a predetermined sequential order enabling you to automate the process of turning on your system, changing devices, or other common tasks. The AVR 240's remote can store up to five separate macro command sequences: one that is associated with the Power On Button a and four more that are accessed by pressing the Macro Buttons T. 1. Press the Mute Button f and the Macro Button T to be programmed or the Power On Button a at the same time. An Input Selector 44 PROGRAMMING THE REMOTE
-
 1
1 -
2
-
3
-
4
-
5
-
6
-
7
-
8
-
9
-
10
-
11
-
12
-
13
-
14
-
15
-
16
-
17
-
18
-
19
-
20
-
21
-
22
-
23
-
24
-
25
-
26
-
27
-
28
-
29
-
30
-
31
-
32
-
33
-
34
-
35
-
36
-
37
-
38
-
 39
39 -
 40
40 -
 41
41 -
 42
42 -
 43
43 -
 44
44 -
 45
45 -
 46
46 -
 47
47 -
 48
48 -
 49
49 -
50
-
51
-
52
-
53
-
54
-
55
-
56
-
57
-
58
-
59
-
60
-
61
-
62
-
63
-
64
 |
 |