HP 8100n HP LaserJet 8100, 8100 N, 8100 DN Printers - Getting Started Guide, C - Page 19
Step 8, Load Tray 1 Optional
 |
UPC - 088698296417
View all HP 8100n manuals
Add to My Manuals
Save this manual to your list of manuals |
Page 19 highlights
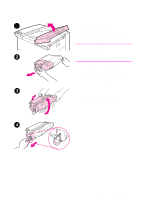
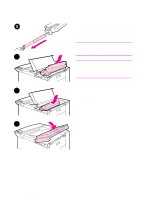
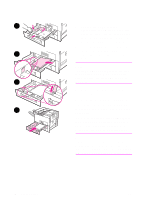
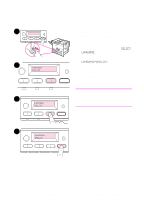
Step 8 Load Tray 1 (Optional) 1 Tray 1 is a multi-purpose tray and holds up to 100 sheets of paper or 10 envelopes. Tray 1 provides a convenient way to print envelopes, transparencies, custom-size paper, labels, or other types of media without having to unload the other trays. CAUTION To avoid a paper jam, never add or remove paper from Tray 1 while the printer is printing. To avoid damaging the printer, print labels and transparencies from Tray 1 only. Send them to the Top Output Bin, do not print them on both sides, and remove them promptly. Note Paper loaded in Tray 1 will be printed first unless the Tray 1 setting is changed from the printer control panel. To change the order in which trays will be printed from, see your online user guide. 1 Open Tray 1. 2 Pull out the tray extension, if needed for the paper size you are printing. 3 Slide the paper width guides to the appropriate size marked on the tray. 4 Place paper into the tray without stacking it above the paperfill mark. Continued on next page. EN Load Tray 1 (Optional) 13
-
 1
1 -
2
-
3
-
4
-
5
-
6
-
7
-
8
-
9
-
10
-
11
-
12
-
13
-
 14
14 -
 15
15 -
 16
16 -
 17
17 -
 18
18 -
 19
19 -
 20
20 -
 21
21 -
 22
22 -
 23
23 -
 24
24 -
25
-
26
-
27
-
28
-
29
-
30
-
31
-
32
-
33
-
34
-
35
-
36
-
37
-
38
-
39
-
40
 |
 |
