HP 8100n HP LaserJet 8100, 8100 N, 8100 DN Printers - Getting Started Guide, C - Page 22
Step 10 Install or Change the Control Panel, Overlay Optional
 |
UPC - 088698296417
View all HP 8100n manuals
Add to My Manuals
Save this manual to your list of manuals |
Page 22 highlights
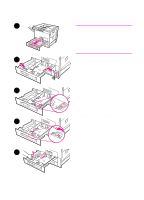
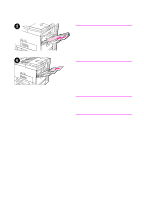
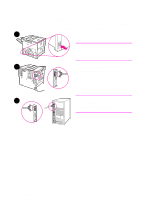
Step 10 Install or Change the Control Panel Overlay (Optional) 1 To change the overlay to a language other than English: 1 Locate the overlay you wish to install and remove it from its bag. Note Make certain the power switch is off. 2 2 Gently lift up on each side of the installed overlay. 3 Insert your thumbnail or a thin, rigid object in front of the overlay and press toward the back of the printer. Lift to remove. 4 To install the new overlay, position it 3 over the control panel, rear-side first. 5 Snap the overlay firmly onto the control panel. Ensure that the overlay is flat. 4 5 16 Printer Setup EN
-
 1
1 -
2
-
3
-
4
-
5
-
6
-
7
-
8
-
9
-
10
-
11
-
12
-
13
-
14
-
15
-
16
-
 17
17 -
 18
18 -
 19
19 -
 20
20 -
 21
21 -
 22
22 -
 23
23 -
 24
24 -
 25
25 -
 26
26 -
 27
27 -
28
-
29
-
30
-
31
-
32
-
33
-
34
-
35
-
36
-
37
-
38
-
39
-
40
 |
 |

16
Printer Setup
EN
Step 10 Install or Change the Control Panel
Overlay (Optional)
To change the overlay to a language
other than English:
1
Locate the overlay you wish to install
and remove it from its bag.
Note
Make certain the power switch is off.
2
Gently lift up on each side of the
installed overlay.
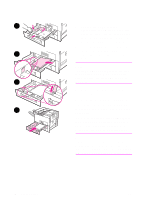
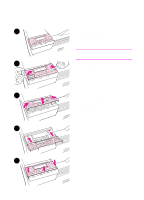
3
Insert your thumbnail or a thin, rigid
object in front of the overlay and
press toward the back of the printer.
Lift to remove.
4
To install the new overlay, position it
over the control panel, rear-side first.
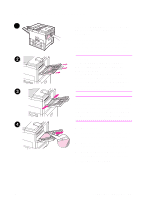
5
Snap the overlay firmly onto the
control panel. Ensure that the
overlay is flat.
1
2
3
4
5