HP BladeSystem bc2800 Service Reference Guide: HP BladeSystem PC bc2000/bc2500 - Page 9
Replacing the Memory, Powering Down the BladeSystem PC, on Removing a Blade PC
 |
View all HP BladeSystem bc2800 manuals
Add to My Manuals
Save this manual to your list of manuals |
Page 9 highlights
3. Pull down the ejector lever (2). 4. Remove the blade PC from the enclosure. To install a new blade PC, reverse the removal procedures. Replacing the Memory 1. Power down the blade PC (Powering Down the BladeSystem PC on page 3). 2. Remove the blade PC from the enclosure (Removing a Blade PC on page 4). 3. Release the latches on each side of the DIMM slot (1). This allows the module to rotate upward. 4. Remove the DIMM from the slot (2). NOTE: bc2800 shown To replace the module: 1. Insert the DIMM at a 15 degree angle (1), making sure that the notch on the bottom of the DIMM aligns with the notch in the socket. Removal and Replacement 5
-
 1
1 -
2
-
3
-
 4
4 -
 5
5 -
 6
6 -
 7
7 -
 8
8 -
 9
9 -
 10
10 -
 11
11 -
 12
12 -
 13
13 -
 14
14 -
15
-
16
-
17
-
18
-
19
-
20
-
21
-
22
-
23
 |
 |
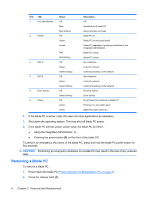
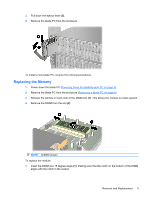
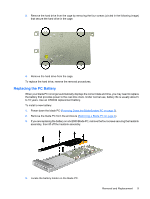
3.
Pull down the ejector lever
(2)
.
4.
Remove the blade PC from the enclosure.
To install a new blade PC, reverse the removal procedures.
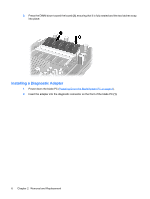
Replacing the Memory
1.
Power down the blade PC (
Powering Down the BladeSystem PC
on page
3
).
2.
Remove the blade PC from the enclosure (
Removing a Blade PC
on page
4
).
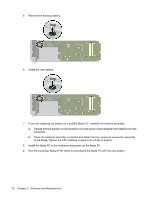
3.
Release the latches on each side of the DIMM slot
(1)
. This allows the module to rotate upward.
4.
Remove the DIMM from the slot
(2)
.
NOTE:
bc2800 shown
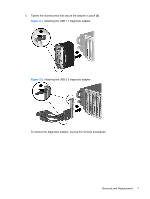
To replace the module:
1.
Insert the DIMM at a 15 degree angle
(1)
, making sure that the notch on the bottom of the DIMM
aligns with the notch in the socket.
Removal and Replacement
5