HP CF285A User Manual - Page 61
Additional print tasks (Mac OS X), Cancel a print job (Mac OS X), Select the paper size (Mac OS X)
 |
View all HP CF285A manuals
Add to My Manuals
Save this manual to your list of manuals |
Page 61 highlights
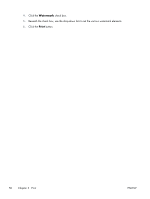
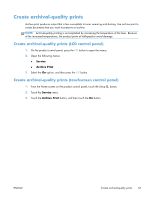
Additional print tasks (Mac OS X) Cancel a print job (Mac OS X) 1. If the print job is currently printing, cancel it by pressing the Cancel button on the product control panel. NOTE: Pressing the Cancel button clears the job that the product is currently processing. If more than one print job is waiting, pressing the Cancel button clears the print job that currently appears on the product control panel. 2. You can also cancel a print job from a software program or a print queue. ● Software program: Typically, a dialog box appears briefly on the computer screen, allowing you to cancel the print job. ● Mac print queue: Open the print queue by double-clicking the product icon in the dock. Highlight the print job, and then click Delete. Select the paper size (Mac OS X) 1. On the File menu, click the Print option. 2. In the Printer menu, select this product. 3. In the Copies & Pages menu, click the Page Setup button. 4. Select a size from the Paper Size drop-down list, and then click the OK button. 5. Click the Print button. Select a custom paper size (Mac OS X) 1. On the File menu, click the Print option. 2. In the Printer menu, select this product. 3. In the Copies & Pages menu, click the Page Setup button. 4. From the Paper Size drop-down list, select the Manage Custom Sizes option. 5. Specify the dimensions for the page size, and then click the OK button. 6. Click the Print button. Print watermarks (Mac OS X) 1. On the File menu, click the Print option. 2. In the Printer menu, select this product. 3. Open the Watermarks menu. ENWW Additional print tasks (Mac OS X) 49
-
 1
1 -
2
-
3
-
4
-
5
-
6
-
7
-
8
-
9
-
10
-
11
-
12
-
13
-
14
-
15
-
16
-
17
-
18
-
19
-
20
-
21
-
22
-
23
-
24
-
25
-
26
-
27
-
28
-
29
-
30
-
31
-
32
-
33
-
34
-
35
-
36
-
37
-
38
-
39
-
40
-
41
-
42
-
43
-
44
-
45
-
46
-
47
-
48
-
49
-
50
-
51
-
52
-
53
-
54
-
55
-
 56
56 -
 57
57 -
 58
58 -
 59
59 -
 60
60 -
 61
61 -
 62
62 -
 63
63 -
 64
64 -
 65
65 -
 66
66 -
67
-
68
-
69
-
70
-
71
-
72
-
73
-
74
-
75
-
76
-
77
-
78
-
79
-
80
-
81
-
82
-
83
-
84
-
85
-
86
-
87
-
88
-
89
-
90
-
91
-
92
-
93
-
94
-
95
-
96
-
97
-
98
-
99
-
100
-
101
-
102
-
103
-
104
-
105
-
106
-
107
-
108
-
109
-
110
-
111
-
112
-
113
-
114
-
115
-
116
-
117
-
118
-
119
-
120
-
121
-
122
-
123
-
124
-
125
-
126
-
127
-
128
-
129
-
130
-
131
-
132
-
133
-
134
-
135
-
136
-
137
-
138
-
139
-
140
-
141
-
142
-
143
-
144
-
145
-
146
-
147
-
148
 |
 |