HP CM3530 HP Color LaserJet CM3530 MFP Series - Analog Fax Accessory 500 Send - Page 74
Functional errors, The test does not print, The e-mail notification is disabled
 |
UPC - 884420196501
View all HP CM3530 manuals
Add to My Manuals
Save this manual to your list of manuals |
Page 74 highlights
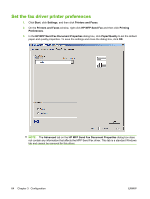
Functional errors The test page does not print View the MFP Send Fax configuration information on the MFP control panel to determine if the driver installation was successful and the PC Fax Send feature is enabled. 1. On the MFP control panel, touch Administration. 2. Scroll to and touch Initial Setup. 3. Scroll to and touch Fax Setup. 4. Scroll to and touch PC Fax Send. 5. Touch Enabled. 6. Touch Save. If PC Fax Send is not in menu, see PC FAX SEND or PC Fax Send does not appear on the MFP control panel on page 69. The e-mail notification is disabled The e-mail notification type is disabled under Notification on the Setup tab in the HP MFP Send Fax dialog box because the e-mail function is not enabled on the MFP. See the user guide for instructions about configuring the e-mail function. Update the HP MFP Send Fax settings after enabling the e-mail feature on the MFP. 1. Click Start, click Settings, and then click Printers and Faxes. 2. Under Printer Tasks in the Printers and Faxes window, right-click the name of the MFP and then click Properties. 3. In the HP MFP Send Fax Properties dialog box, click Device Settings. 68 Chapter 4 Solve problems ENWW
-
 1
1 -
2
-
3
-
4
-
5
-
6
-
7
-
8
-
9
-
10
-
11
-
12
-
13
-
14
-
15
-
16
-
17
-
18
-
19
-
20
-
21
-
22
-
23
-
24
-
25
-
26
-
27
-
28
-
29
-
30
-
31
-
32
-
33
-
34
-
35
-
36
-
37
-
38
-
39
-
40
-
41
-
42
-
43
-
44
-
45
-
46
-
47
-
48
-
49
-
50
-
51
-
52
-
53
-
54
-
55
-
56
-
57
-
58
-
59
-
60
-
61
-
62
-
63
-
64
-
65
-
66
-
67
-
68
-
 69
69 -
 70
70 -
 71
71 -
 72
72 -
 73
73 -
 74
74 -
 75
75 -
 76
76 -
 77
77 -
 78
78 -
 79
79 -
80
-
81
-
82
-
83
-
84
-
85
-
86
-
87
-
88
 |
 |
