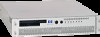
HP Carrier-grade cc3300 UserÆs Guide and Technical UserÆs Gu - Page 72
Removing and Installing the Top Cover
 |
View all HP Carrier-grade cc3300 manuals
Add to My Manuals
Save this manual to your list of manuals |
Page 72 highlights
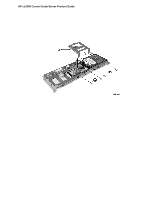
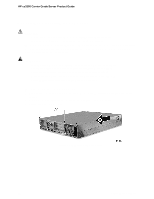
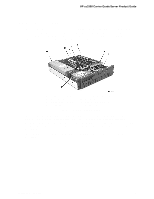
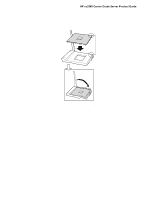
HP cc3300 Carrier Grade Server Product Guide Removing and Installing the Top Cover CAUTION For proper cooling and airflow, do not operate the server with the cover removed. Always reinstall the cover before turning the server on. The server comes with a removable Top Cover. Removal of this cover is necessary when installing or removing many components. You do not have to remove the Top Cover when removing or installing power supplies or hard drives. WARNING If rack mounted, make sure that the rack is anchored securely so it will not tilt forward when the server chassis is extended. A crush hazard exists should the rack tilt forward that could cause serious injury. Only use a screwdriver tip to push in the lock tabs on the rack slides. A pinch hazard exists if fingers are used for this purpose. To remove the top cover, follow this procedure: 1. Remove the four screws along the rear panel (A in Figure 14) that secure the top cover to the chassis. 2. Slide the top cover rearward (B in Figure 14) to release it from the chassis. 3. Lift the top cover up to remove. Figure 14. Removing the Top Cover 72 Upgrading the Hardware
-
 1
1 -
2
-
3
-
4
-
5
-
6
-
7
-
8
-
9
-
10
-
11
-
12
-
13
-
14
-
15
-
16
-
17
-
18
-
19
-
20
-
21
-
22
-
23
-
24
-
25
-
26
-
27
-
28
-
29
-
30
-
31
-
32
-
33
-
34
-
35
-
36
-
37
-
38
-
39
-
40
-
41
-
42
-
43
-
44
-
45
-
46
-
47
-
48
-
49
-
50
-
51
-
52
-
53
-
54
-
55
-
56
-
57
-
58
-
59
-
60
-
61
-
62
-
63
-
64
-
65
-
66
-
 67
67 -
 68
68 -
 69
69 -
 70
70 -
 71
71 -
 72
72 -
 73
73 -
 74
74 -
 75
75 -
 76
76 -
 77
77 -
78
-
79
-
80
-
81
-
82
-
83
-
84
-
85
-
86
-
87
-
88
-
89
-
90
-
91
-
92
-
93
-
94
-
95
-
96
-
97
-
98
-
99
-
100
-
101
-
102
-
103
-
104
-
105
-
106
-
107
-
108
-
109
-
110
-
111
-
112
-
113
-
114
-
115
-
116
-
117
-
118
-
119
-
120
-
121
-
122
-
123
-
124
-
125
-
126
-
127
-
128
-
129
-
130
-
131
-
132
-
133
 |
 |
