HP D2D .D2D NAS Integration with HP Data Protector 6.11 (EH985-90933, March 20 - Page 6
menu in Windows Computer Management. After, Services, NAS - Shares, Create Share, Description - login
 |
View all HP D2D manuals
Add to My Manuals
Save this manual to your list of manuals |
Page 6 highlights
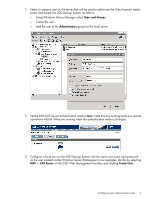
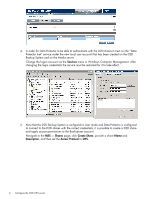
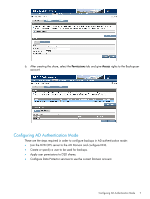
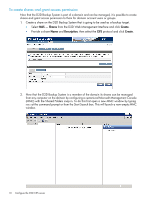
4. In order for Data Protector to be able to authenticate with the D2D shares it must run the "Data Protector Inet" service under the new local user account that has been created on the D2D Backup System and on the Media server. Change the logon account via the Services menu in Windows Computer Management. After changing the login credentials the service must be restarted for it to take effect. 5. Now that the D2D Backup System is configured in User mode and Data Protector is configured to connect to the D2D shares with the correct credentials, it is possible to create a D2D share and apply access permissions to the Backupuser account. Navigate to the NAS - Shares page, click Create Share, provide a share Name and Description, and then set the Access Protocol to CIFS. 6 Configure the D2D CIFS server
-
 1
1 -
 2
2 -
 3
3 -
 4
4 -
 5
5 -
 6
6 -
 7
7 -
 8
8 -
 9
9 -
 10
10 -
 11
11 -
 12
12 -
13
-
14
-
15
-
16
-
17
-
18
-
19
-
20
-
21
-
22
-
23
-
24
-
25
-
26
-
27
-
28
-
29
-
30
-
31
-
32
-
33
-
34
 |
 |
