HP D4360 Full User Guide - Page 67
Selection numbers, Printing with one print cartridge, Installation instructions - color ink
 |
UPC - 883585617203
View all HP D4360 manuals
Add to My Manuals
Save this manual to your list of manuals |
Page 67 highlights
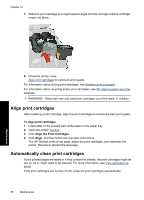
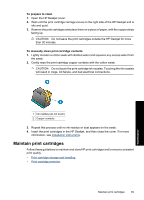
Chapter 10 Choose cartridge combinations for best results • Text and graphics: Combine tri-color and black print cartridges. • Color photos: Combine tri-color and photo print cartridges. Always install the tri-color print cartridge in the left side of the print cartridge carriage. Install the black or photo print cartridge in the right side of the print cartridge carriage. Selection numbers When buying replacement print cartridges, look for the print cartridge selection number. You can find the selection number in three places: • Selection number label: Look at the label on the print cartridge that you are replacing. Maintenance 1 Selection number label • Printer documentation: For a list of print cartridge selection numbers, see the reference guide that came with the printer. • Print Cartridge Information dialog box: For a list of print cartridge selection numbers, open the printer Toolbox, click the Estimated Ink Level tab, and then click the Print Cartridge Information button. Printing with one print cartridge The printer can operate with only one print cartridge installed. For more information, see Ink-backup mode. Installation instructions Always install the tri-color print cartridge in the left side of the print cartridge carriage. Install the black or photo print cartridge in the right side of the print cartridge carriage. To replace a print cartridge 1. Verify that the printer is turned on. 2. Load Letter or A4 plain, white paper in the paper tray. 3. Open the printer cover. 64 Maintenance
-
 1
1 -
2
-
3
-
4
-
5
-
6
-
7
-
8
-
9
-
10
-
11
-
12
-
13
-
14
-
15
-
16
-
17
-
18
-
19
-
20
-
21
-
22
-
23
-
24
-
25
-
26
-
27
-
28
-
29
-
30
-
31
-
32
-
33
-
34
-
35
-
36
-
37
-
38
-
39
-
40
-
41
-
42
-
43
-
44
-
45
-
46
-
47
-
48
-
49
-
50
-
51
-
52
-
53
-
54
-
55
-
56
-
57
-
58
-
59
-
60
-
61
-
 62
62 -
 63
63 -
 64
64 -
 65
65 -
 66
66 -
 67
67 -
 68
68 -
 69
69 -
 70
70 -
 71
71 -
 72
72 -
73
-
74
-
75
-
76
-
77
-
78
-
79
-
80
-
81
-
82
-
83
-
84
-
85
-
86
-
87
-
88
-
89
-
90
-
91
-
92
-
93
-
94
-
95
-
96
-
97
-
98
-
99
-
100
-
101
-
102
-
103
-
104
-
105
-
106
-
107
-
108
-
109
-
110
-
111
-
112
-
113
-
114
-
115
-
116
-
117
-
118
-
119
-
120
-
121
-
122
-
123
-
124
-
125
-
126
-
127
-
128
-
129
-
130
-
131
-
132
-
133
-
134
-
135
-
136
-
137
 |
 |
