HP D4360 Full User Guide - Page 68
CAUTION, Do not touch the print cartridge ink nozzles or copper contacts.
 |
UPC - 883585617203
View all HP D4360 manuals
Add to My Manuals
Save this manual to your list of manuals |
Page 68 highlights
4. Wait until the print cartridge carriage moves to the right side of the printer and is idle and quiet. 5. Press down on the print cartridge, and then slide it out of the print cartridge carriage. Maintenance 6. Remove the replacement print cartridge from its packaging and carefully remove the plastic tape. Hold the print cartridge so that the copper strips are on the bottom and facing toward the printer. 1 Remove plastic tape CAUTION: Do not touch the print cartridge ink nozzles or copper contacts. Touching these parts will result in clogs, ink failure, and bad electrical connections. Do not remove the copper strips. They are required electrical contacts. Install print cartridges 65
-
 1
1 -
2
-
3
-
4
-
5
-
6
-
7
-
8
-
9
-
10
-
11
-
12
-
13
-
14
-
15
-
16
-
17
-
18
-
19
-
20
-
21
-
22
-
23
-
24
-
25
-
26
-
27
-
28
-
29
-
30
-
31
-
32
-
33
-
34
-
35
-
36
-
37
-
38
-
39
-
40
-
41
-
42
-
43
-
44
-
45
-
46
-
47
-
48
-
49
-
50
-
51
-
52
-
53
-
54
-
55
-
56
-
57
-
58
-
59
-
60
-
61
-
62
-
 63
63 -
 64
64 -
 65
65 -
 66
66 -
 67
67 -
 68
68 -
 69
69 -
 70
70 -
 71
71 -
 72
72 -
 73
73 -
74
-
75
-
76
-
77
-
78
-
79
-
80
-
81
-
82
-
83
-
84
-
85
-
86
-
87
-
88
-
89
-
90
-
91
-
92
-
93
-
94
-
95
-
96
-
97
-
98
-
99
-
100
-
101
-
102
-
103
-
104
-
105
-
106
-
107
-
108
-
109
-
110
-
111
-
112
-
113
-
114
-
115
-
116
-
117
-
118
-
119
-
120
-
121
-
122
-
123
-
124
-
125
-
126
-
127
-
128
-
129
-
130
-
131
-
132
-
133
-
134
-
135
-
136
-
137
 |
 |

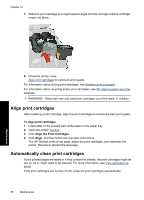
4.
Wait until the print cartridge carriage moves to the right side of the printer and is idle
and quiet.
5.
Press down on the print cartridge, and then slide it out of the print cartridge carriage.
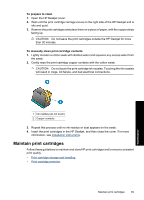
6.
Remove the replacement print cartridge from its packaging and carefully remove the
plastic tape. Hold the print cartridge so that the copper strips are on the bottom and
facing toward the printer.
1
Remove plastic tape
CAUTION:
Do not touch the print cartridge ink nozzles or copper contacts.
Touching these parts will result in clogs, ink failure, and bad electrical connections.
Do not remove the copper strips. They are required electrical contacts.
Install print cartridges
65
Maintenance