HP DesignJet T730 User guide - Page 146
The print is scuffed or scratched, Ink marks on the paper
 |
View all HP DesignJet T730 manuals
Add to My Manuals
Save this manual to your list of manuals |
Page 146 highlights
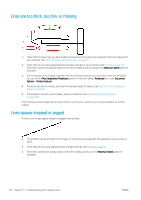
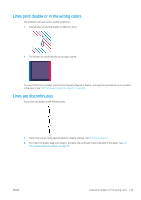
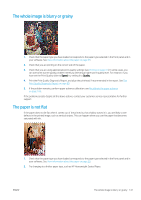
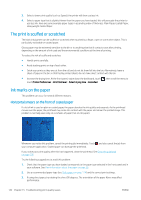
3. Select a lower print quality (such as Speed); the printer will then use less ink. 4. Select a paper type that is slightly thinner than the paper you have loaded; this will persuade the printer to use less ink. Here are some example paper types in ascending order of thickness: Plain Paper, Coated Paper, Heavyweight Coated Paper. The print is scuffed or scratched The black ink pigment can be scuffed or scratched when touched by a finger, a pen or some other object. This is particularly noticeable on coated paper. Glossy paper may be extremely sensitive to the bin or to anything else that it contacts soon after printing, depending on the amount of ink used and the environmental conditions at the time of printing. To reduce the risk of scuffs and scratches: ● Handle prints carefully. ● Avoid stacking prints on top of each other. ● Catch your prints as they are cut from the roll and do not let them fall into the bin. Alternatively, leave a sheet of paper in the bin so that freshly printed sheets do not make direct contact with the bin. ● Increase the drying time. At the front panel, swipe down the dashboard, touch touch Printer Preferences > Print Retrieval > Select drying time > Extended. , then scroll the menu to Ink marks on the paper This problem can occur for several different reasons. Horizontal smears on the front of coated paper If a lot of ink is used on plain or coated paper, the paper absorbs the ink quickly and expands. As the printhead moves over the paper, the printhead may come into contact with the paper and smear the printed image. This problem is normally seen only on cut sheets of paper (not on roll paper). Whenever you notice this problem, cancel the printing job immediately. Touch and also cancel the job from your computer application. Soaked paper can damage the printhead. If you notice poor print quality after this has happened, clean the printhead. See Clean the printhead on page 100. Try the following suggestions to avoid this problem: 1. Check that the paper type you have loaded corresponds to the paper type selected in the front panel and in your software. See View information about the paper on page 39. 2. Use a recommended paper type (see Order paper on page 114) and the correct print settings. 3. If using sheet paper, try rotating the sheet 90 degrees. The orientation of the paper fibers may affect performance. 142 Chapter 15 Troubleshooting print-quality issues ENWW
-
 1
1 -
2
-
3
-
4
-
5
-
6
-
7
-
8
-
9
-
10
-
11
-
12
-
13
-
14
-
15
-
16
-
17
-
18
-
19
-
20
-
21
-
22
-
23
-
24
-
25
-
26
-
27
-
28
-
29
-
30
-
31
-
32
-
33
-
34
-
35
-
36
-
37
-
38
-
39
-
40
-
41
-
42
-
43
-
44
-
45
-
46
-
47
-
48
-
49
-
50
-
51
-
52
-
53
-
54
-
55
-
56
-
57
-
58
-
59
-
60
-
61
-
62
-
63
-
64
-
65
-
66
-
67
-
68
-
69
-
70
-
71
-
72
-
73
-
74
-
75
-
76
-
77
-
78
-
79
-
80
-
81
-
82
-
83
-
84
-
85
-
86
-
87
-
88
-
89
-
90
-
91
-
92
-
93
-
94
-
95
-
96
-
97
-
98
-
99
-
100
-
101
-
102
-
103
-
104
-
105
-
106
-
107
-
108
-
109
-
110
-
111
-
112
-
113
-
114
-
115
-
116
-
117
-
118
-
119
-
120
-
121
-
122
-
123
-
124
-
125
-
126
-
127
-
128
-
129
-
130
-
131
-
132
-
133
-
134
-
135
-
136
-
137
-
138
-
139
-
140
-
 141
141 -
 142
142 -
 143
143 -
 144
144 -
 145
145 -
 146
146 -
 147
147 -
 148
148 -
 149
149 -
 150
150 -
 151
151 -
152
-
153
-
154
-
155
-
156
-
157
-
158
-
159
-
160
-
161
-
162
-
163
-
164
-
165
-
166
-
167
-
168
-
169
-
170
-
171
-
172
-
173
-
174
-
175
-
176
-
177
-
178
-
179
-
180
-
181
-
182
-
183
-
184
-
185
-
186
-
187
-
188
-
189
-
190
-
191
-
192
-
193
-
194
-
195
-
196
-
197
-
198
-
199
-
200
-
201
-
202
-
203
 |
 |
