HP DesignJet T730 User guide - Page 63
Scan options setup process
 |
View all HP DesignJet T730 manuals
Add to My Manuals
Save this manual to your list of manuals |
Page 63 highlights
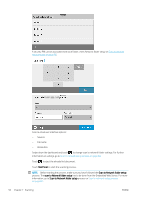
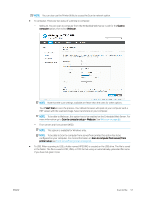
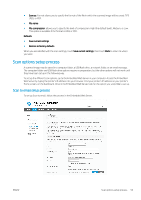
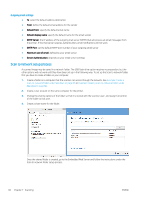
● Save as: Format allows you to specify the format of the file in which the scanned image will be saved: TIFF, JPEG, or PDF. ● File name ● File compression: allows you to specify the level of compression: High (the default level), Medium, or Low. This option is available if the format is JPEG or PDF. Defaults ● Save current settings ● Restore to factory defaults When you are satisfied with the scan settings, touch Save current settings, then touch Back to return to where you were. Scan options setup process A scanned image may be saved in a computer folder, a USB flash drive, a network folder, or an email message. The computer folder and USB flash drive options require no preparation, but the other options will not work until they have been set up in the following way. To set up the different scan options, go to the Embedded Web Server in your computer. Access the Embedded Web Server by typing the printer's IP address into your browser. Find your printer's IP address on your printer's Home screen, on the dashboard. Once in the Embedded Web Server, look for the option you would like to set up. Scan to email setup process To set up Scan to email, follow the process in the Embedded Web Server. ENWW Scan options setup process 59
-
 1
1 -
2
-
3
-
4
-
5
-
6
-
7
-
8
-
9
-
10
-
11
-
12
-
13
-
14
-
15
-
16
-
17
-
18
-
19
-
20
-
21
-
22
-
23
-
24
-
25
-
26
-
27
-
28
-
29
-
30
-
31
-
32
-
33
-
34
-
35
-
36
-
37
-
38
-
39
-
40
-
41
-
42
-
43
-
44
-
45
-
46
-
47
-
48
-
49
-
50
-
51
-
52
-
53
-
54
-
55
-
56
-
57
-
 58
58 -
 59
59 -
 60
60 -
 61
61 -
 62
62 -
 63
63 -
 64
64 -
 65
65 -
 66
66 -
 67
67 -
 68
68 -
69
-
70
-
71
-
72
-
73
-
74
-
75
-
76
-
77
-
78
-
79
-
80
-
81
-
82
-
83
-
84
-
85
-
86
-
87
-
88
-
89
-
90
-
91
-
92
-
93
-
94
-
95
-
96
-
97
-
98
-
99
-
100
-
101
-
102
-
103
-
104
-
105
-
106
-
107
-
108
-
109
-
110
-
111
-
112
-
113
-
114
-
115
-
116
-
117
-
118
-
119
-
120
-
121
-
122
-
123
-
124
-
125
-
126
-
127
-
128
-
129
-
130
-
131
-
132
-
133
-
134
-
135
-
136
-
137
-
138
-
139
-
140
-
141
-
142
-
143
-
144
-
145
-
146
-
147
-
148
-
149
-
150
-
151
-
152
-
153
-
154
-
155
-
156
-
157
-
158
-
159
-
160
-
161
-
162
-
163
-
164
-
165
-
166
-
167
-
168
-
169
-
170
-
171
-
172
-
173
-
174
-
175
-
176
-
177
-
178
-
179
-
180
-
181
-
182
-
183
-
184
-
185
-
186
-
187
-
188
-
189
-
190
-
191
-
192
-
193
-
194
-
195
-
196
-
197
-
198
-
199
-
200
-
201
-
202
-
203
 |
 |
