HP DesignJet T730 User guide - Page 38
Load a roll into the printer
 |
View all HP DesignJet T730 manuals
Add to My Manuals
Save this manual to your list of manuals |
Page 38 highlights
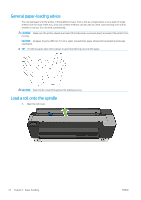
6. Put the blue paper stop on to the open end of the spindle, and push it towards the end of the roll. The roll cannot exceed the blue hub as illustrated below. 7. Ensure the blue paper stop is pushed in as far as it goes. Check that there is no space between the roll and the stops at both ends. IMPORTANT: Make sure that the roll does not exceed the blue hub. NOTE: The printer only accepts rolls with 2-inch cores. For further details on roll specifications, see Paper specifications on page 190. If you are a regular user of different paper types, you can change rolls more quickly if you preload rolls of different paper types on different spindles. Extra spindles are available for purchase, see Accessories on page 113. Load a roll into the printer To start this procedure, you must have a roll loaded on the spindle. See Load a roll onto the spindle on page 32. 1. From the front panel, select the paper tab, touch , then touch Load roll and follow the front panel instructions. This step is optional: if you just start feeding in roll paper, the printer recognizes that you want to load a roll. 2. Make sure the cover is open. 34 Chapter 5 Paper handling ENWW
-
 1
1 -
2
-
3
-
4
-
5
-
6
-
7
-
8
-
9
-
10
-
11
-
12
-
13
-
14
-
15
-
16
-
17
-
18
-
19
-
20
-
21
-
22
-
23
-
24
-
25
-
26
-
27
-
28
-
29
-
30
-
31
-
32
-
 33
33 -
 34
34 -
 35
35 -
 36
36 -
 37
37 -
 38
38 -
 39
39 -
 40
40 -
 41
41 -
 42
42 -
 43
43 -
44
-
45
-
46
-
47
-
48
-
49
-
50
-
51
-
52
-
53
-
54
-
55
-
56
-
57
-
58
-
59
-
60
-
61
-
62
-
63
-
64
-
65
-
66
-
67
-
68
-
69
-
70
-
71
-
72
-
73
-
74
-
75
-
76
-
77
-
78
-
79
-
80
-
81
-
82
-
83
-
84
-
85
-
86
-
87
-
88
-
89
-
90
-
91
-
92
-
93
-
94
-
95
-
96
-
97
-
98
-
99
-
100
-
101
-
102
-
103
-
104
-
105
-
106
-
107
-
108
-
109
-
110
-
111
-
112
-
113
-
114
-
115
-
116
-
117
-
118
-
119
-
120
-
121
-
122
-
123
-
124
-
125
-
126
-
127
-
128
-
129
-
130
-
131
-
132
-
133
-
134
-
135
-
136
-
137
-
138
-
139
-
140
-
141
-
142
-
143
-
144
-
145
-
146
-
147
-
148
-
149
-
150
-
151
-
152
-
153
-
154
-
155
-
156
-
157
-
158
-
159
-
160
-
161
-
162
-
163
-
164
-
165
-
166
-
167
-
168
-
169
-
170
-
171
-
172
-
173
-
174
-
175
-
176
-
177
-
178
-
179
-
180
-
181
-
182
-
183
-
184
-
185
-
186
-
187
-
188
-
189
-
190
-
191
-
192
-
193
-
194
-
195
-
196
-
197
-
198
-
199
-
200
-
201
-
202
-
203
 |
 |
