HP Designjet 815mfp HP Designjet 4200 Scanner - User Guide - Page 13
how do I copy thick media?, to copy thick media… - rollers
 |
View all HP Designjet 815mfp manuals
Add to My Manuals
Save this manual to your list of manuals |
Page 13 highlights
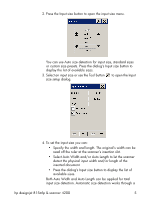
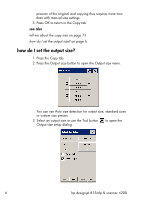
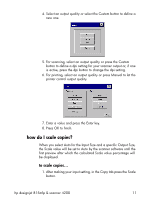
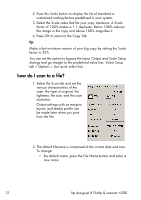
4. To set the output size you can: • Specify the width and length. The original's width can be read off the ruler at the scanner's insertion slot. • Select Auto Width and/or Auto Length to let the scanner detect the physical input width and/or length of the inserted document. • Press the dialog's Output size button to display the list of available sizes. Both Auto Width and Auto Length can be applied for total output size detection. Automatic size detection works through a prescan of the original and copying thus requires more time than with manual size settings. 5. Press OK to return to the Copy tab. You can also use a scale factor to determine the output size. See how do I scale copies? on page 11. see also tell me about the copy size on page 73 how do I set the input size? on page 4 how do I copy thick media? Scanning thick media can require enlarging the insertion slot and this can affect the scanner's automatic control of border lines between the cameras-called Stitching. First you must adjust the insertion slot to accommodate your thick media. See how do I change the insertion slot height? on page 8. to copy thick media... 1. Load the thick original you wish to scan. Center loading is recommended with thick originals. The scanner's transport rollers grip more evenly with center loading. 2. Make a test scan. Bulky thick media need to be supported with both hands both into and out of the scanner. Stitching errors will be easiest to see on an image with one or more clear diagonal lines. hp designjet 815mfp & scanner 4200 7
-
 1
1 -
2
-
3
-
4
-
5
-
6
-
7
-
 8
8 -
 9
9 -
 10
10 -
 11
11 -
 12
12 -
 13
13 -
 14
14 -
 15
15 -
 16
16 -
 17
17 -
 18
18 -
19
-
20
-
21
-
22
-
23
-
24
-
25
-
26
-
27
-
28
-
29
-
30
-
31
-
32
-
33
-
34
-
35
-
36
-
37
-
38
-
39
-
40
-
41
-
42
-
43
-
44
-
45
-
46
-
47
-
48
-
49
-
50
-
51
-
52
-
53
-
54
-
55
-
56
-
57
-
58
-
59
-
60
-
61
-
62
-
63
-
64
-
65
-
66
-
67
-
68
-
69
-
70
-
71
-
72
-
73
-
74
-
75
-
76
-
77
-
78
-
79
-
80
-
81
-
82
-
83
-
84
-
85
-
86
-
87
-
88
-
89
-
90
-
91
-
92
-
93
-
94
-
95
-
96
-
97
-
98
-
99
-
100
-
101
-
102
-
103
-
104
-
105
-
106
-
107
-
108
-
109
-
110
 |
 |