HP Designjet 815mfp HP Designjet 4200 Scanner - User Guide - Page 85
tell me about unprintable areas, ‘account for unprintable area’ option, option
 |
View all HP Designjet 815mfp manuals
Add to My Manuals
Save this manual to your list of manuals |
Page 85 highlights
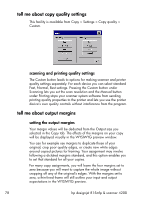
tell me about unprintable areas 'account for unprintable area' option The margins we set in the Setup tab dialog are the copy's 'output margins'. But the printer itself also creates margins. The size of your printer's margins or so-called 'unprintable area' depends on the printer model and cannot be changed. You should consider the printer's margins as your minimum margins and they will be in your output whether you want them to or not. The 'Account for unprintable area' option is found in the Margins dialog and it lets you compensate for these uncontrollable margins. Selecting the option lets you economize paper usage by keeping unneeded margin space down to a minimum. Selecting the option will tell the application to deduct the printer's enforced margins from your output margins so the total margins are as you specified for the copy. For duplicating originals without margins, you would not want output margins either and thus the option should be deselected. To use the option, you have to enter your printer's unprintable area values as specified in your printer documentation. This is done through the Setup tab > Printer > Unprintable Area button. Here are some guidelines on using the 'Account for unprintable area' option. If you select 'Account for unprintable area': • You will also have selected a minimum output margin at least equal to the printer's margins. The program will automatically update the values in the Setup tab's margin values to reflect this. If you set output margins to zero or lower than the printer's, then the printer's margins are used and updated as the output margins. • If the output margins you set are higher than the printer's, then the printer's margins are deducted from the output margins meaning the scanner software only adds on the margins that the printer is missing. This means that your total margin, measured from the paper's physical edges, will be as you specified in the Setup tab's Margins option. • The cropping effect on the original is always determined by the value displayed on the Setup tab's Margin button whether it was automatically calculated or not. The actual cropping effect will be as displayed in your WYSIWYG preview. hp designjet 815mfp & scanner 4200 79
-
 1
1 -
2
-
3
-
4
-
5
-
6
-
7
-
8
-
9
-
10
-
11
-
12
-
13
-
14
-
15
-
16
-
17
-
18
-
19
-
20
-
21
-
22
-
23
-
24
-
25
-
26
-
27
-
28
-
29
-
30
-
31
-
32
-
33
-
34
-
35
-
36
-
37
-
38
-
39
-
40
-
41
-
42
-
43
-
44
-
45
-
46
-
47
-
48
-
49
-
50
-
51
-
52
-
53
-
54
-
55
-
56
-
57
-
58
-
59
-
60
-
61
-
62
-
63
-
64
-
65
-
66
-
67
-
68
-
69
-
70
-
71
-
72
-
73
-
74
-
75
-
76
-
77
-
78
-
79
-
 80
80 -
 81
81 -
 82
82 -
 83
83 -
 84
84 -
 85
85 -
 86
86 -
 87
87 -
 88
88 -
 89
89 -
 90
90 -
91
-
92
-
93
-
94
-
95
-
96
-
97
-
98
-
99
-
100
-
101
-
102
-
103
-
104
-
105
-
106
-
107
-
108
-
109
-
110
 |
 |
