HP ENVY 17-3000 HP ENVY17 3D Getting Started - Windows 7 (3D Models Only) - Page 69
into the notches. The release latch automatically locks the cover into place.
 |
View all HP ENVY 17-3000 manuals
Add to My Manuals
Save this manual to your list of manuals |
Page 69 highlights
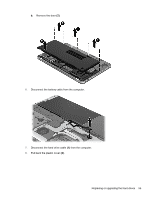
6. Replace the 6 service access door screws (2). 7. Align the tabs on the hard drive cover with the notches on the computer, and then slide the cover into the notches. The release latch automatically locks the cover into place. 8. Reconnect external power and external devices. 9. Turn on the computer. 58 Chapter 6 Maintenance
-
 1
1 -
2
-
3
-
4
-
5
-
6
-
7
-
8
-
9
-
10
-
11
-
12
-
13
-
14
-
15
-
16
-
17
-
18
-
19
-
20
-
21
-
22
-
23
-
24
-
25
-
26
-
27
-
28
-
29
-
30
-
31
-
32
-
33
-
34
-
35
-
36
-
37
-
38
-
39
-
40
-
41
-
42
-
43
-
44
-
45
-
46
-
47
-
48
-
49
-
50
-
51
-
52
-
53
-
54
-
55
-
56
-
57
-
58
-
59
-
60
-
61
-
62
-
63
-
 64
64 -
 65
65 -
 66
66 -
 67
67 -
 68
68 -
 69
69 -
 70
70 -
 71
71 -
 72
72 -
 73
73 -
 74
74 -
75
-
76
-
77
-
78
-
79
-
80
-
81
-
82
-
83
-
84
-
85
-
86
-
87
-
88
-
89
-
90
 |
 |

6.
Replace the 6 service access door screws
(2)
.
7.
Align the tabs on the hard drive cover with the notches on the computer, and then slide the cover
into the notches. The release latch automatically locks the cover into place.
8.
Reconnect external power and external devices.
9.
Turn on the computer.
58
Chapter 6
Maintenance