HP LaserJet Enterprise MFP M430 LaserJet Enterprise MFP M430 M431 User Guide - Page 161
Clear paper jams, Paper jam locations
 |
View all HP LaserJet Enterprise MFP M430 manuals
Add to My Manuals
Save this manual to your list of manuals |
Page 161 highlights
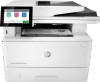
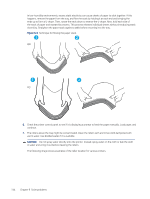
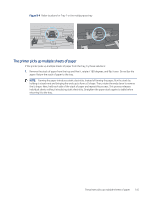
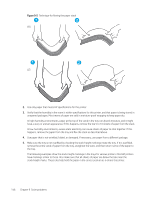
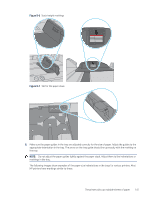
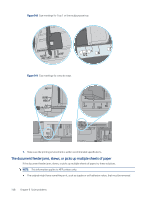
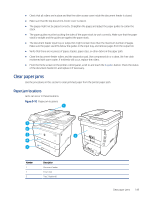
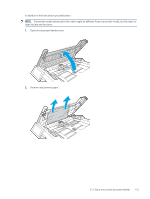
● Check that all rollers are in place and that the roller-access cover inside the document feeder is closed. ● Make sure that the top document-feeder cover is closed. ● The pages might not be placed correctly. Straighten the pages and adjust the paper guides to center the stack. ● The paper guides must be touching the sides of the paper stack to work correctly. Make sure that the paper stack is straight and the guides are against the paper stack. ● The document feeder input tray or output bin might contain more than the maximum number of pages. Make sure the paper stack fits below the guides in the input tray, and remove pages from the output bin. ● Verify that there are no pieces of paper, staples, paper clips, or other debris in the paper path. ● Clean the document-feeder rollers and the separation pad. Use compressed air or a clean, lint-free cloth moistened with warm water. If misfeeds still occur, replace the rollers. ● From the Home screen on the printer control panel, scroll to and touch the Supplies button. Check the status of the document-feeder kit, and replace it if necessary. Clear paper jams Use the procedures in this section to clear jammed paper from the printer paper path. Paper jam locations Jams can occur in these locations. Figure 9-10 Paper jam locations 1 7 6 5 2 4 3 Number 1 2 3 Description Document feeder Fuser area Tray 3 (optional) Clear paper jams 149
-
 1
1 -
2
-
3
-
4
-
5
-
6
-
7
-
8
-
9
-
10
-
11
-
12
-
13
-
14
-
15
-
16
-
17
-
18
-
19
-
20
-
21
-
22
-
23
-
24
-
25
-
26
-
27
-
28
-
29
-
30
-
31
-
32
-
33
-
34
-
35
-
36
-
37
-
38
-
39
-
40
-
41
-
42
-
43
-
44
-
45
-
46
-
47
-
48
-
49
-
50
-
51
-
52
-
53
-
54
-
55
-
56
-
57
-
58
-
59
-
60
-
61
-
62
-
63
-
64
-
65
-
66
-
67
-
68
-
69
-
70
-
71
-
72
-
73
-
74
-
75
-
76
-
77
-
78
-
79
-
80
-
81
-
82
-
83
-
84
-
85
-
86
-
87
-
88
-
89
-
90
-
91
-
92
-
93
-
94
-
95
-
96
-
97
-
98
-
99
-
100
-
101
-
102
-
103
-
104
-
105
-
106
-
107
-
108
-
109
-
110
-
111
-
112
-
113
-
114
-
115
-
116
-
117
-
118
-
119
-
120
-
121
-
122
-
123
-
124
-
125
-
126
-
127
-
128
-
129
-
130
-
131
-
132
-
133
-
134
-
135
-
136
-
137
-
138
-
139
-
140
-
141
-
142
-
143
-
144
-
145
-
146
-
147
-
148
-
149
-
150
-
151
-
152
-
153
-
154
-
155
-
 156
156 -
 157
157 -
 158
158 -
 159
159 -
 160
160 -
 161
161 -
 162
162 -
 163
163 -
 164
164 -
 165
165 -
 166
166 -
167
-
168
-
169
-
170
-
171
-
172
-
173
-
174
-
175
-
176
-
177
-
178
-
179
-
180
-
181
-
182
-
183
-
184
-
185
-
186
-
187
-
188
-
189
-
190
-
191
-
192
-
193
-
194
-
195
-
196
-
197
-
198
-
199
-
200
-
201
-
202
-
203
-
204
-
205
-
206
-
207
-
208
-
209
-
210
-
211
-
212
-
213
-
214
-
215
-
216
-
217
-
218
-
219
-
220
-
221
-
222
-
223
-
224
-
225
-
226
-
227
-
228
-
229
-
230
-
231
-
232
-
233
-
234
-
235
-
236
-
237
-
238
-
239
-
240
-
241
-
242
-
243
-
244
-
245
-
246
-
247
-
248
-
249
-
250
-
251
-
252
-
253
-
254
-
255
-
256
-
257
-
258
-
259
-
260
-
261
-
262
-
263
-
264
-
265
-
266
 |
 |
