HP M5035 HP LaserJet M5025/M5035 MFP - (mulitple language) Getting Started Gui - Page 24
Troubleshooting - cartridge
 |
UPC - 882780574533
View all HP M5035 manuals
Add to My Manuals
Save this manual to your list of manuals |
Page 24 highlights
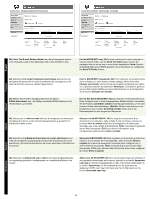
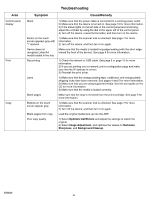
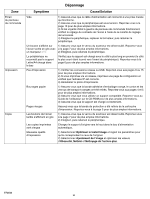
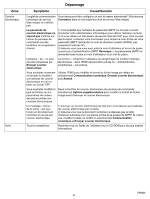
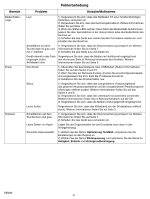
Area Control-panel display Print Copy Troubleshooting Symptom Cause/Remedy Blank Button on the touch screen appears gray with "!" markers Device does not recognize Letter/A4 media loaded in the tray Not printing Jams Blank pages Buttons on the touch screen appear gray Blank pages from copy Poor copy quality 1) Make sure that the power cable is connected to a working power outlet. 2) Make sure that the device is turned on. See page 10 for more information. 3) If the status lights on the left side of the control panel are functioning, adjust the contrast by using the dial in the upper left of the control panel. 4) Turn off the device, reseat the formatter, and then turn on the device. 1) Make sure that the scanner lock is unlocked. See page 7 for more information. 2) Turn off the device, and then turn it on again. Make sure that the media is loaded long-edge leading (with the short edge toward the front of the device). See page 6 for more information. 1) Check the network or USB cable. See page 9 or page 15 for more information. 2) If you are printing over a network, print a configuration page and make sure that the IP address is correct. 3) Reinstall the print driver. 1) Make sure that the orange packing tape, cardboard, and orange plastic shipping locks have been removed. See pages 4 and 5 for more information. 2) Make sure that you are using supported media. See the user guide on the CD for more information. 3) Make sure that the media is loaded correctly. Make sure that the strip is removed from the print cartridge. See page 5 for more information. 1) Make sure that the scanner lock is unlocked. See page 7 for more information. 2) Turn off the device, and then turn it on again. Load the original media face up into the ADF. 1) Select Optimize text/Picture and adjust the settings to match the original. 2) Select Image Adjustment, and optimize the values for Darkness, Sharpness, and Background Cleanup. ENWW 23
-
 1
1 -
2
-
3
-
4
-
5
-
6
-
7
-
8
-
9
-
10
-
11
-
12
-
13
-
14
-
15
-
16
-
17
-
18
-
 19
19 -
 20
20 -
 21
21 -
 22
22 -
 23
23 -
 24
24 -
 25
25 -
 26
26 -
 27
27 -
 28
28 -
 29
29 -
30
-
31
-
32
-
33
-
34
-
35
-
36
-
37
-
38
-
39
-
40
-
41
-
42
-
43
-
44
-
45
-
46
-
47
-
48
-
49
-
50
-
51
-
52
 |
 |
